Fuzzing embedded systems - Part 1, Introduction
Intro
This will be the start of a series of blog posts based on my bachelor’s degree thesis, developed during an internship at Secure Network srl1. The objective of the internship was to analyze an embedded device, and develop tools to test its security.
As a result I developed a fuzzer to search for vulnerabilities in CGI binaries and a Binary Ninja plugin to search for ROP chains in MIPS binaries, as well as an exploit for one of the crashes triaged.
Today will be really introductory and we will briefly explore the basics of how to obtain and analyze a device’s firmware, and the process to choose a target binary for the fuzzer. In the next part we will explore how to write a binary-only fuzzer in LibAFL and finally in the third part how to exploit the vulnerabilities found.
Target choice
Embedded device is quite a broad term, and it encompasses many different type of systems, from huge solar inverters to tiny IoT cameras. These devices are designed to perform a handful of specific tasks, and often have ad-hoc hardware and software to do so.
The requirements for low power consumption (they are designed to not be powered off) and low memory consumption (system resources are kept to a minimum to reduce cost and size) make implementing a lot of the modern memory corruption mitigations impossible. This makes them a prime target to gain a foothold in a network.
Since there are a miriad of devices which could be classified as “embedded systems”, we have to find the type of device which better suits our needs. I wanted a device which:
- Exposes a number of services to the network.
- Whose compromise could lead to having further access to user data or to the network on which it’s installed.
- It’s cheap enough that if I accidentally break it, it won’t break the bank.
For this reasons I chose to target a router.
Commercial routers have to handle a lot of different network services as well as services to manage them, making their attack surface quite extended. Also, compromising one could grant access to different sections of the network.
So I headed to Amazon and chose the one reported as “most purchased” at the time which was the DSL-3788 by D-Link2, a router designed with home use in mind.
Studying hardware configuration
Luckily someone uploaded pictures of their damaged router on a support forum3, which allowed me to research the PCB and the components before even buying the router. From the uploaded pictures we can note a few things.
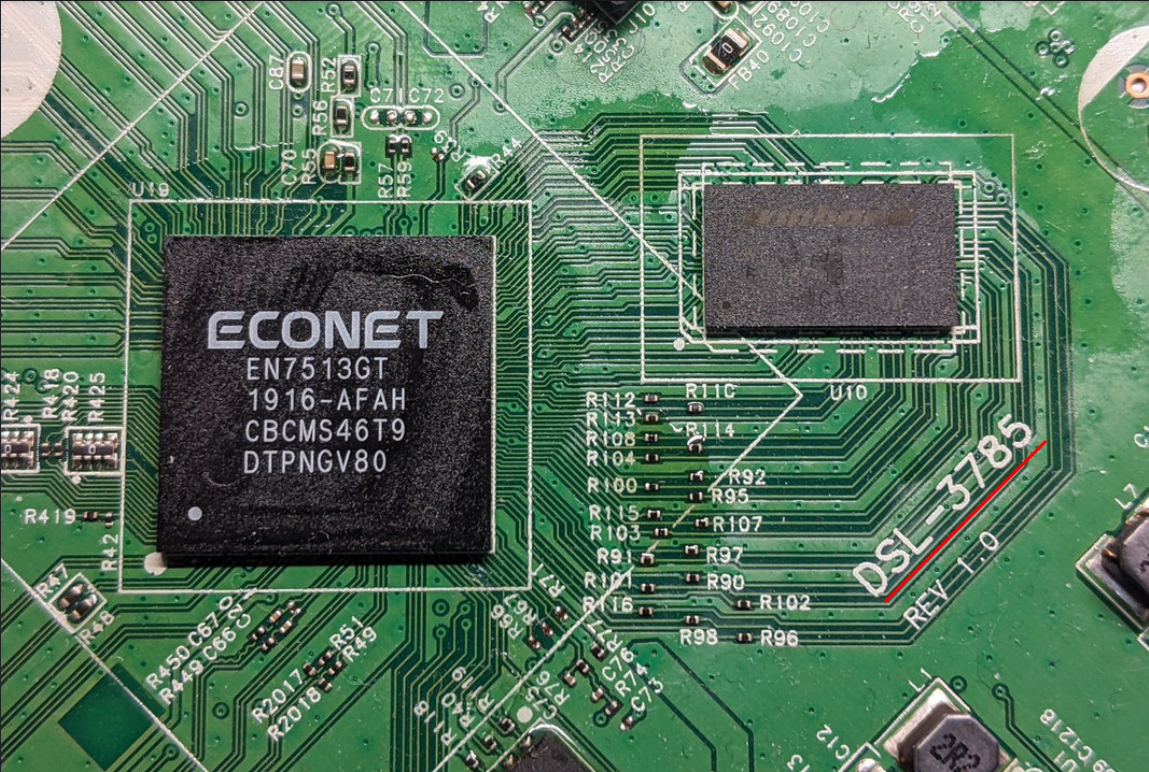
The PCB is engraved with the model number of another router. This make it more probable that code is also reused, meaning that a vulnerability found could affect multiple models. We can also identify single components like CPUs, memories and available interfaces. Identifying this components is fundamental to perform hardware attacks and gain important information which we will use during the analysis of the software. As an example, by identifying the CPU model as EcoNet EN7513GT we can determine the architecture used, which in this case it’s MIPS. This will prove to be really important (and a real pain) later.
We can also see a potential UART interface. Exposed serial communication interfaces (e.g., UART, JTAG) are the low hanging fruit for firmware extraction. Extracting firmware using this interfaces usually requires low to none hardware modification, and relatively cheap hardware to interact with them.
If none are found, it might be necessary to dump the firmware directly from memory. This is done by either detaching the flash memory chip completely and attaching it to a memory reader, or by sniffing the traffic between the integrated circuit and flash memory. Firmware isn’t usually encrypted at rest, but high-security devices might have it as a feature, making dumping the flash memory useless.
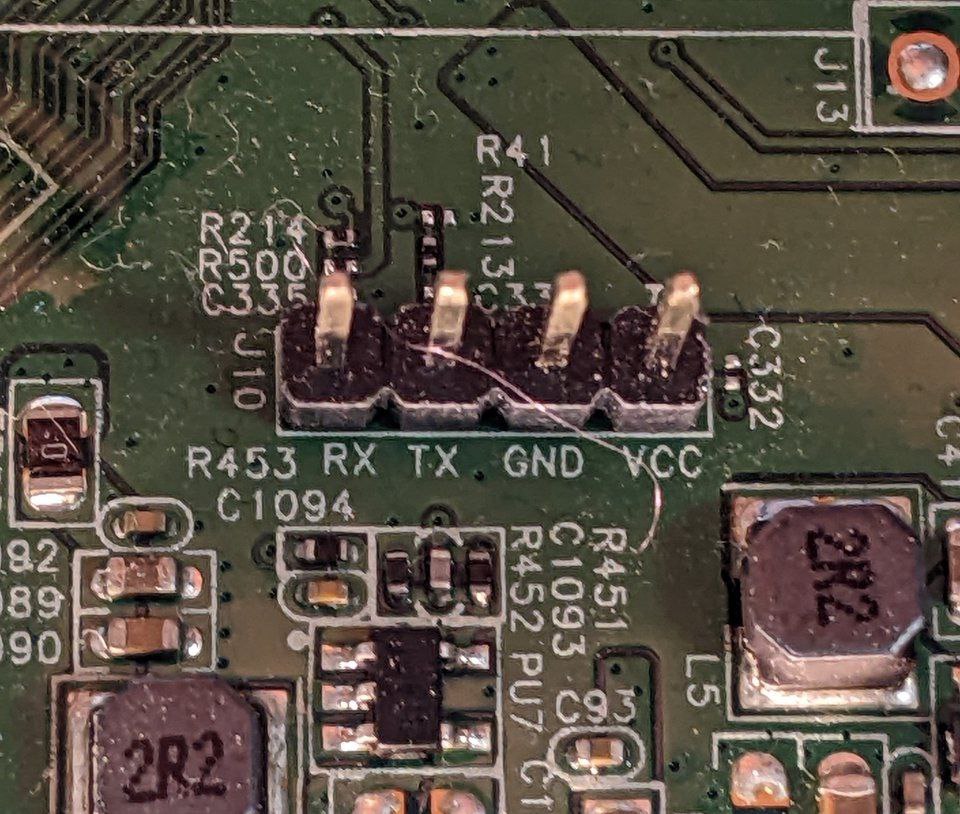
An alleged UART port is visible (just guessing, based on the 4 pins in a row) in the pictures provided, and engraved right below the pins are the (alleged) use of the pins.
Testing the UART port
A UART port can be used to communicate through serial with the integrated circuit and it’s used by vendors to debug the device. Usually the pins are not installed on production devices, and only the pads are exposed. These pads have sometimes their traces interrupted to stop end users from interacting with it.
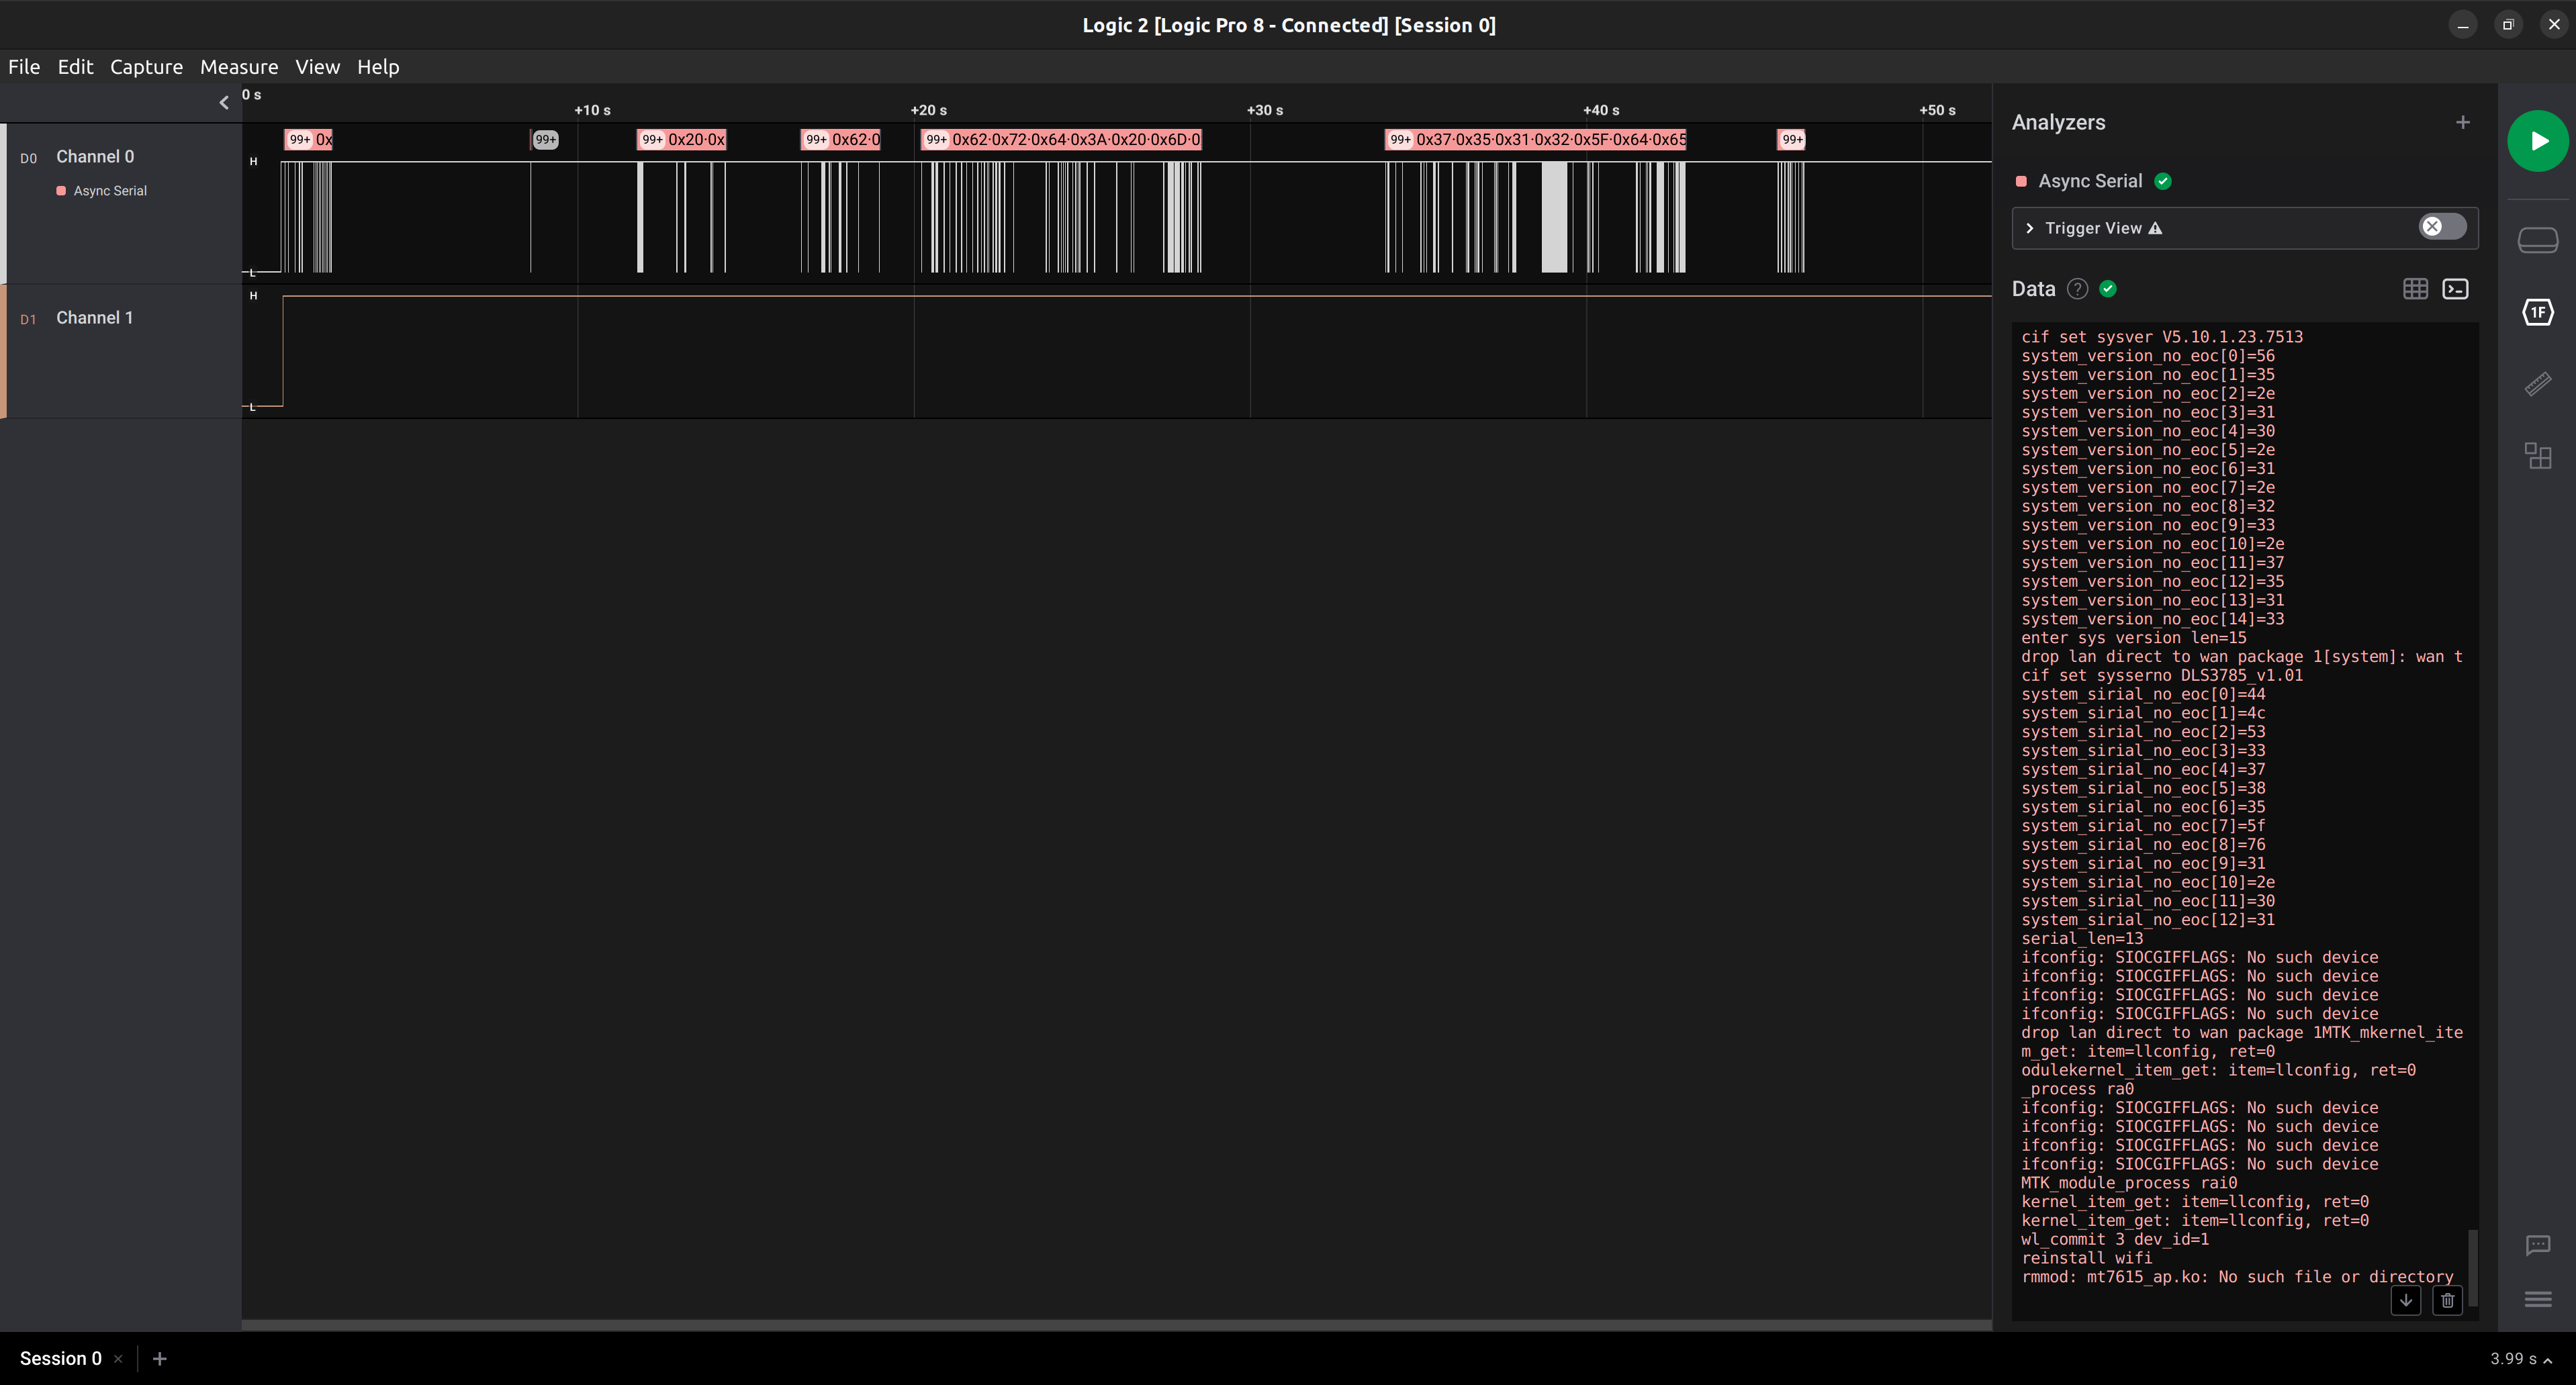
I first tested if the pins found were connected and the engraving on the PCB was correct by using a multimeter on each of them. There are also other more physical techniques to check if the pads are connected, like shining a bright light oh the backside of the PCB as detailed here4. I then used a logic analyzer to verify if the port was communicating correctly, and which was the correct baudrate which the interface uses to communicate. The logic analyzer shows some logs as output! Meaning it does in fact communicate through serial (thankfully, because my soldering skills are almost non-existant).
Obtaining firmware
Firmware is typically distributed by vendor in encrypted form, to prevent users from reversing it or modifying the code run on the system. Usually this leads to interacting with hardware to get the software, but there are software-only ways to get it. If even only one past version of the firmware did not have encryption, we could decrypt the following versions using its code as detailed in this ZDI article5. This has the added benefit of being able to decrypt different firmwares of the same vendor, by writing just one decryptor.
Sometimes firmware is distributed in unencrypted form through update systems directly on the device or, for modern embedded systems, through a mobile application. It might be worth trying to intercept the traffic (especially if you already have a mobile app testing laboratory) and check if it’s possible to get an unencrypted firmware update this way.
In this case I decided, for future debugging purposes, to go with the hardware route and interact with the UART port we discovered previously. We can now connect using our favorite serial communication tool, and interact with an exposed (root) shell.
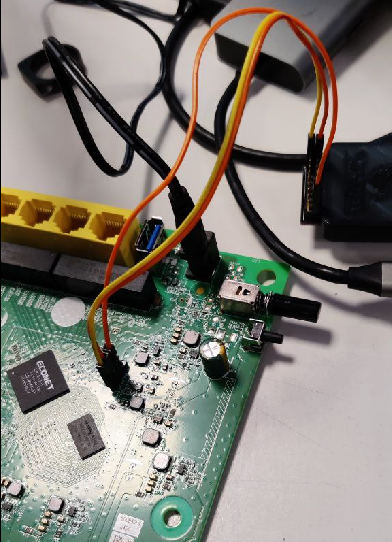
There are many different tools available to do this (Glasgow, Shikra, Buspirate, JTAGulator, etc.) with different prices ranges according to the number of supported protocols. The one shown in the picture and used during the research is a Shikra.
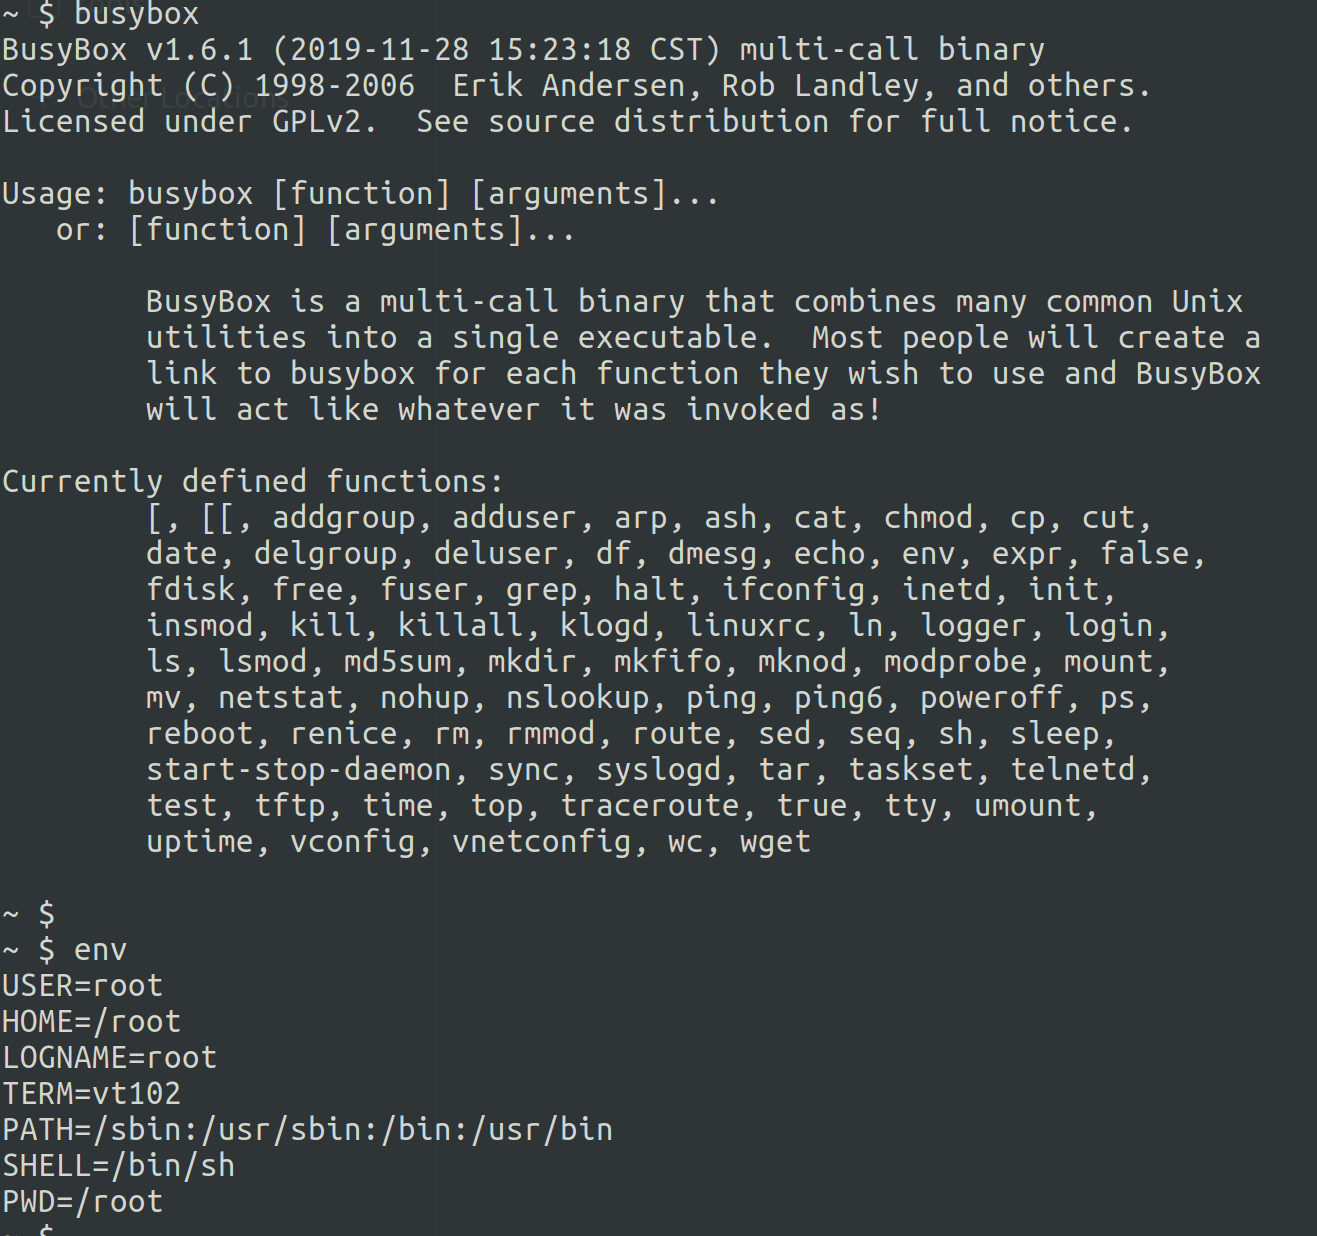
After connecting the pins as instructed by the Shikra documentation we can see an interactive root shell, we can use this to explore the firmware and dump it to our machine to get information more easily. The commands available are often really limited (as seen in the picture above), uploading a more versatile version of Busybox will lift the limitations and give us the tools to actually analyse and dump the system.
In my specific case I used wget on the device and a local Python webserver on my machine to download my Busybox on the device (it’s important to note that a reboot will delete the file), and then used dd to download all of the firmware data.
Dumping from a live system also has the added benefit of being more precise in how the it’s setup at runtime and gives us access to temporary files and logs useful during the analysis.
Firmware recon
Great, now that we have a firmware to analyse, what are we looking for?
A great place to start is the startup configuration of the system.
init is the inizialization process started by the kernel, and its configuration depends of the init system used.
If sysvinit is used, it will load its configuration from /etc/inittab.
If systemdinit is used, it will load its configuration from unit files. These are searched in the system unit path and user unit path.
Both of them will execute the scripts contained the directory /etc/init.d, which are fundamental to enumerate the custom services started by the firmware.
Below, as an example, an extract of the file daemon.rc found in the firmware for the DSL-3788 router. Please note the mini_httpd webserver running as root, right at the end of the snippet.
#!/bin/sh

if [ "${HTTPS}" = "yes" ]; then

if [ "${HTTPS_2048}" = "yes" ]; then
	/usr/sbin/openssl genrsa -out /var/openssl/cakey.pem 2048 -aes256
	/usr/sbin/openssl req -new -x509 -days 2922 -key /var/openssl/cakey.pem -config /var/openssl/openssl.cnf -out /var/openssl/cacert.pem -sha256
else
	/usr/sbin/openssl genrsa -out /var/openssl/cakey.pem 1028
	/usr/sbin/openssl req -new -x509 -days 2922 -key /var/openssl/cakey.pem -config /var/openssl/openssl.cnf -out /var/openssl/cacert.pem
fi
	/bin/cat /var/openssl/cakey.pem > /var/openssl/mini_httpd.pem
	/bin/cat /var/openssl/cacert.pem >> /var/openssl/mini_httpd.pem
	/usr/sbin/mini_httpd -d /usr/www -c '/cgi-bin/*' -u root -S -E /var/openssl/mini_httpd.pem -T utf-8 -Y ALL:!SHA
else
	/usr/sbin/mini_httpd -d /usr/www -c '/cgi-bin/*' -u root -T utf-8
fi
The /etc/passwd file is perfect for looking for unsecured users or custom login shells. Sometimes these devices allow for restricted SSH access and the custom login shells used might be vulnerable or have undocumented administrative functions ( 😉 ).
top and ps are great for looking at the active processes and the command strings used when they were started. The command strings might reveal credentials, configuration files, or potential misconfigurations (like the webserver running as root shown before).
Configuration files (usually identified with the extension .conf) might reveal additional information on the services used.
Below, as an example, there’s a series of configuration files found in the router. Note how one of them is in the /tmp directory, and would’ve been missed in case I didn’t take an image of a live system.
sparrrgh@sparrrgh-spacebase:$ find . -type f -iname "*conf*" -not -empty -exec grep -Iq . {} \; -print
./var/siproxd.conf
./var/smb.conf
./var/udhcpd.conf
./var/tmp/snmpd.conf
./var/dhcp-fwd.conf
./var/xml/WFAWLANConfigSCPD.xml
./man/man8/iwconfig.8
./tmp/snmpd.conf
./usr/www/js/New_GUI/DeviceConfig.js
./usr/www/js/New_GUI/configuration/DeviceConfig.js
./usr/www/new_web/New_GUI/Set/config_upgrade.asp
./usr/www/html/languages/es_es/page/qos_config.js
./usr/www/html/languages/es_es/page/queueconfig.js
./usr/www/html/languages/it_it/page/qos_config.js
./usr/www/html/languages/it_it/page/queueconfig.js
./usr/www/html/languages/fr_fr/page/qos_config.js
./usr/www/html/languages/fr_fr/page/queueconfig.js
./usr/www/html/languages/en_us/page/queueconfig.js
./usr/www/html/languages/en_us/page/qos_config.js
./usr/www/html/languages/de_de/page/qos_config.js
./usr/www/html/languages/de_de/page/queueconfig.js
./etc/inetd.conf
./etc/bftpd.conf
./etc/config_full.xml
./etc/udhcpd.conf
./etc/samba/smb.conf
./etc/config.xml
./etc/siproxd.conf
./etc/host.conf
Finally, check for custom kernel modules. It’s really hard to exploit modules remotely (one crash and the whole system is gone), but an attack through a module might let you skip the privilege escalation phase.
A good place to look for custom kernel modules is again the init.d directory.
Below is an example of searching for scripts which use the command insmod, this is the command used to load modules in the kernel.
sparrrgh@sparrrgh-spacebase:$ grep "insmod" *
btn.rc:insmod /lib/modules/driver/btn.ko
led.rc:insmod /lib/modules/driver/led.ko
rcS:insmod /lib/modules/module_sel.ko
rcS:insmod /lib/modules/tcvlantag.ko
rcS:insmod /lib/modules/tcledctrl.ko
rcS:insmod /lib/modules/tccicmd.ko
rcS:insmod /lib/modules/sif.ko
rcS:insmod $KERNEL_DIR/kernel/drivers/net/ifb.ko
rcS:insmod /lib/modules/crypto_k.ko
rcS:echo "insmod ETH_LAN driver"
rcS:insmod /lib/modules/fe_core.ko
rcS:insmod /lib/modules/qdma_lan.ko
rcS:insmod /lib/modules/eth.ko
rcS:insmod /lib/modules/eth_ephy.ko
rcS:insmod /lib/modules/dying_gasp.ko
rcS:insmod /lib/modules/driver/product.ko
rcS:insmod /lib/modules/qdma_wan.ko
rcS:insmod /lib/modules/tc3162_dmt.ko
rcS:insmod $KERNEL_DIR/kernel/net/sched/act_mirred.ko
rcS:insmod $KERNEL_DIR/kernel/net/sched/cls_fw.ko
rcS:insmod $KERNEL_DIR/kernel/net/sched/sch_htb.ko
rcS:insmod $KERNEL_DIR/kernel/net/sched/sch_prio.ko
rcS:#insmod $KERNEL_DIR/kernel/net/bridge/netfilter/ebtables.ko
rcS:insmod $KERNEL_DIR/kernel/net/bridge/netfilter/ebtable_filter.ko
rcS:insmod $KERNEL_DIR/kernel/net/bridge/netfilter/ebt_ip.ko
rcS:insmod $KERNEL_DIR/kernel/net/bridge/netfilter/ebt_ip6.ko
rcS:insmod /lib/modules/hw_nat.ko FOE_NUM=16
rcS:insmod /lib/modules/2.6.36/kernel/drivers/usb/class/usblp.ko
tbs_nfp.rc:	insmod /lib/modules/2.6.36/kernel/net/nfp_adapter/tbs_nfp_adapter.ko
tbs_nfp.rc:	insmod /lib/modules/2.6.36/kernel/net/nfp_adapter/tbs_nfp_module.ko
Choosing which executable to fuzz
After looking around for a bit, I had to decide which executable I wanted to fuzz.
I wanted a service which was reachable from an attacker without physical access to the device and with low-to-none user interaction (this will make creating an harness for the executable way easier when developing a fuzzer).
With this in mind I chose to fuzz the CGI binaries of the web server used to configure and manage the router.
These binaries have the added benefit of having none of the recommended mitigations used by modern compilers, meaning we can pwn like we are Aleph One[TODO] in ‘96.

What is CGI, and how does it work
From RFC 38756:
The Common Gateway Interface (CGI) allows an HTTP, server and a CGI script to share responsibility for responding to client requests. The client request comprises a Uniform Resource Identifier (URI), a request method and various ancillary information about the request provided by the transport protocol. The CGI defines the abstract parameters, known as meta-variables, which describe a client’s request. Together with a concrete programmer interface this specifies a platform-independent interface between the script and the HTTP server.
Which basically means that it’s a way to extend the functionalities of a web server by providing access to custom CGI “scripts”. These executable files are usually Perl scripts, but binaries can also be used (which are the intended target of the fuzzer we want to build).
In the case of binaries, each time the web server receives a request for a CGI script it will spin up a new process and forward the necessary data to the binary using environment variables, while the body of the request is usually forwarded using standard input. Having no user interaction in the executable makes it easy to write an harness, since all the input will be sent by the webserver right at the start of the execution.
Specifically, the firmware analysed uses two CGIs to handle all of the requests, but we will delve deeper in how exactly it works when developing the fuzzing harness for them in the next post.
In the next post
We will talk about specifics on the process to create the fuzzer and the grammar used for testing the CGI-bins, and how I triaged the crashes.
If you have questions or suggestions, you can email me at max[at]sparrrgh[dot]me.